Instruments
External In
Similar to the routing of Live, the External In is an important routing element that allows you to use video signals from external hardware devices, from other software using Syphon or Spout, or from other tracks within Live.
Three input types are available:
- Device is for receiving video from external devices, like (web)cameras.
- Syphon (macOS) or Spout (Windows) lets you receive video from other apps.
- Track is for receiving video signals from other tracks within this Live Set.
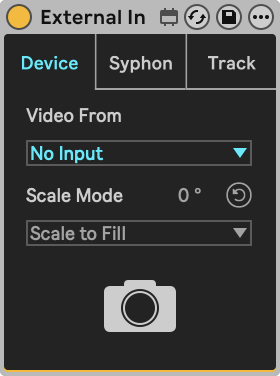
- Device mode
- Spout/Syphon mode
- Track mode
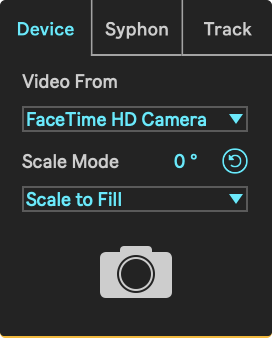
While in Device mode, the device can receive a video signal from external sources, such as webcams, cameras, etc. Any external source that can be detected by Quicktime should also be detected by Videosync.
Parameters
- Video From: Sets the external source to receive video from.
- Scale Mode: Defines the scaling mode for this track:
- Scale to Fit scales the video to fit the window while keeping the original aspect ratio.
- Scale to Fill scales the video to completely cover the window while respecting the original aspect ratio.
- Stretch to Fill stretches the video to completely fill the window, not respecting original aspect ratio.
- Original does not alter the video in any way.
- Rotate Input: Rotates the input in steps of 90 degrees.
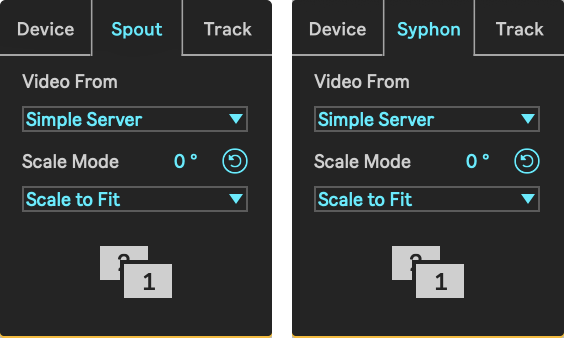
Spout (Windows) and Syphon (macOS) are technologies that allow applications to share frames - full frame rate video or stills - with one another in real-time. When in Spout/Syphon mode, the device can receive a video signal from any other Spout/Syphon enabled app.
Parameters
- Video From: Sets the Spout/Syphon Server to receive video textures from.
- Scaling: Defines the scaling mode for the incoming syphon signal.
- Scale to Fit scales the video to fit exactly in the window while keeping the original aspect ratio.
- Scale to Fill scales up the video to completely cover the window while still respecting the original aspect ratio.
- Stretch to Fill stretches the video to completely fill the window, not respecting original aspect ratio.
- Original does not scale or stretch the video in any way.
- Rotate Input: Rotates the input in steps of 90 degrees.
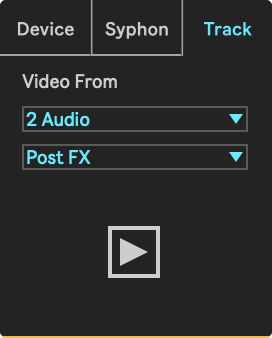
When in Track mode, the device can receive a video signal from any other track within the Live Set.
Parameters
- Video From: Sets the source track to receive video from.
- Tapping: Selects the tapping point at which the source's signal is tapped.
For more information about routing or texture sharing from other applications, see Routing or Spout and Syphon.
Squares
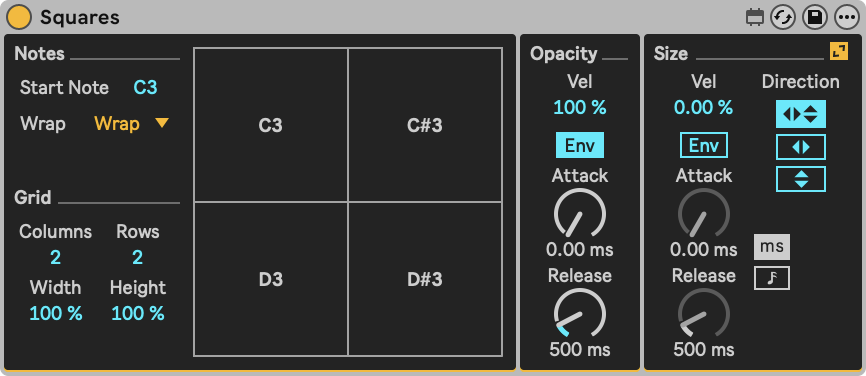
Seemingly simplistic, but very powerful when combined with various effects. The Squares instrument allows you to generate white squares on the screen using MIDI notes that can follow two different envelopes.
- Grid
- Opacity
- Size
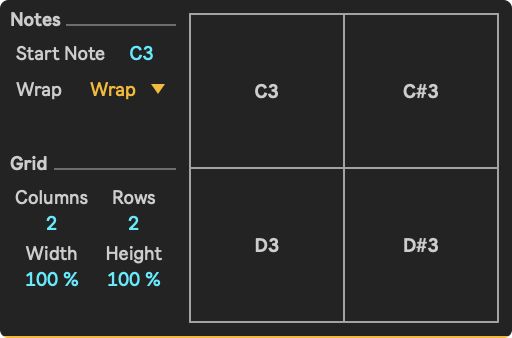
Graphical User Interface
A respresentation of the output window, which is divided in a set number of rows and columns. Each square is triggered by a different MIDI note, or by using the cursor.
Parameters
- Start Note: Sets the pitch on which the first square will be triggered. Following squares are triggered by succeeding note numbers until no squares can be drawn.
- Note Wrap: This sets the wrap mode for incoming notes, which determines what happens to notes that fall outside the range defined by the Start Note and the number of squares that can be drawn based on the Columns and Rows parameters.
- None discards notes outside the range.
- Wrap wraps notes to fit within the range.
- Mirror mirrors notes to fit within the range.
- Clamp clamps notes to edges of the range.
- Columns: Sets the number of columns in which the squares are divided.
- Rows: Sets number of rows in which the squares will be divided.
- Width: Sets the width of a square inside its boundaries.
- Height: Sets the height of a square inside its boundaries.
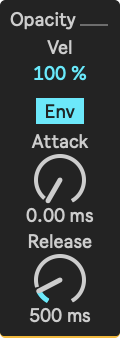
Parameters
- Opacity Velocity: This defines how much the opacity depends upon note velocity.
- Opacity Envelope: When enabled, the square's opacity will be controlled by an envelope. When disabled, the square's opacity will be 1 as long as the note is held.
- Opacity Attack: The opacity envelope's attack time, in ms or beats.
- Opacity Release: The opacity envelope's release time, in ms or beats.

Parameters
- Size Velocity: This defines how much the square's size depends upon note velocity.
- Size Envelope: When enabled, the square's size will be controlled by an envelope. When disabled, the square's size will be the full size set as long as the note is held.
- Size Attack: The size envelope's attack time, in ms or beats.
- Size Release: The size envelope's release time, in ms or beats.
- Global Envelope Time Mode: This defines whether envelope times are defined in beats or in milliseconds.
- Direction: Sets the direction for the Size envelope.
Tabula
Click here to watch a video tutorial about Tabula.
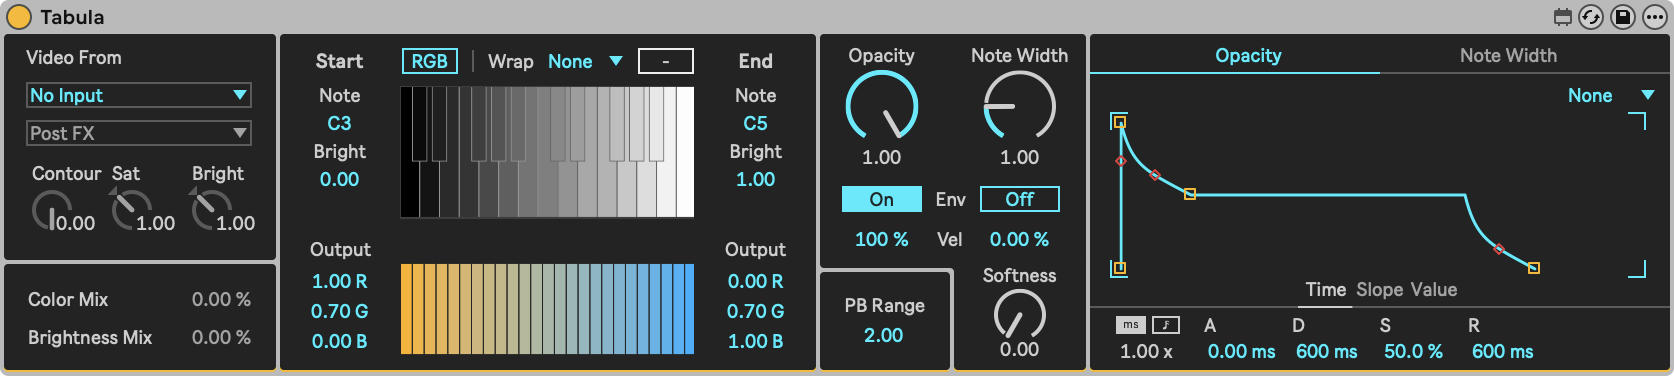
Creates a brightness-to-color table, which is used to map brightness of a sidechain input to color. Incoming MIDI notes define which parts of the table are used for mapping. Each note that falls within the note range defined by Start Note and End Note, activates the mapping of a part of the total brightness range, defined by Start Brightness to End Brightness. This brightness range is then mapped to the output colors as defined by Start Output Color and End Output Color.
- Input
- Table
- Controls
- Envelopes

Parameters
- Sidechain Source: This sidechain serves as the brightness map that define which pixels the output colors are mapped onto. "None" disables this mapping, causing Tabula to output a pure brightness-to-color lookup table, with left corresponding to black and right corresponding to white.
- Sidechain Tapping Point: Selects the point at which the sidechain signal is tapped.
- Sidechain Contour: Sets the amount of blur to apply to the sidechain.
- Sidechain Saturation: Sets the amount with which to multiply the sidechain saturation.
- Sidechain Brightness: Sets the amount with which to multiply the sidechain brightness.
- Color Mix: Sets the mix between color of 'mapped output color' and 'sidechain color'.
- Brightness Mix: Sets the balance between brightness of 'mapped output color' and 'sidechain color'.
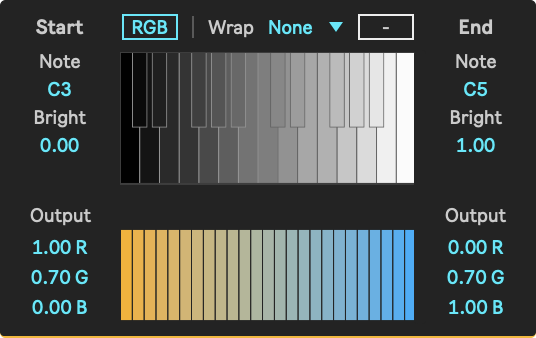
Graphical User Interface
- The top represents the input brightness of each pixel, with pure black being on the left end of the keyboard, and pure white being on the right end of the keyboard. By playing different notes, different parts of the image will light up, based on their brightness.
- The gap displays colors once their mapped notes are triggered.
- The bottom gradient section represents the colors that the pixels of the input are mapped to, based on their brightness levels.
Parameters
- Start/End Note: Start/End of the note range that defines which parts of the brightness-to-color mapping is activated upon receiving incoming notes.
- Start/End Bright: Start/End of the brightness range that defines which parts of the brightness-to-color mapping is activated upon receiving incoming notes.
- Start/End Output Color: Start/End of the color range that the brightness range is mapped to.
- Color Format: Sets the color format for the Dark, Mid and Light colors. Options are RGBA (Red Green Blue) and HSLA (Hue Saturation Lightness). Both color formats share the same alpha values.
- In RGB mode:
- Red: Sets the Red amount for the respective color.
- Green: Sets the Green amount for the respective color.
- Blue: Sets the Blue amount for the respective color.
- In HSL mode:
- Hue: Sets the Hue amount for the respective color.
- Saturation: Sets the Saturation amount for the respective color.
- Lightness: Sets the Lightness amount for the respective color.
- In RGB mode:
- Note Wrap: This sets the wrap mode for incoming notes.
- None discards notes outside the range.
- Wrap wraps notes to fit within the range.
- Mirror mirrors notes to fit within the range.
- Clamp clamps notes to edges of the range.
Parameters
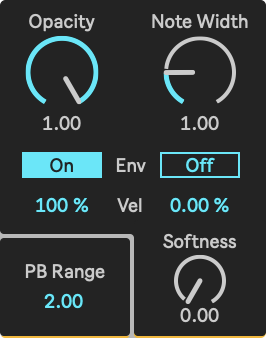
- Opacity: Sets the opacity of the output color.
- Opacity Envelope Switch: This turns the Opacity envelope on and off.
- Opacity Velocity Amount: This defines how much the opacity depends upon note velocity.
- Note Width: Sets the width of the slice of the total brightness range that is mapped per incoming note.
- Note Width Envelope Switch: This turns the Note Width envelope on and off.
- Note Width Velocity Amount: This defines how much the note width depends upon note velocity.
- Feather: Sets the amount of opacity reduction on the output color towards the note width edges.
- PB Range: Sets the pitch bend range for Tabula.
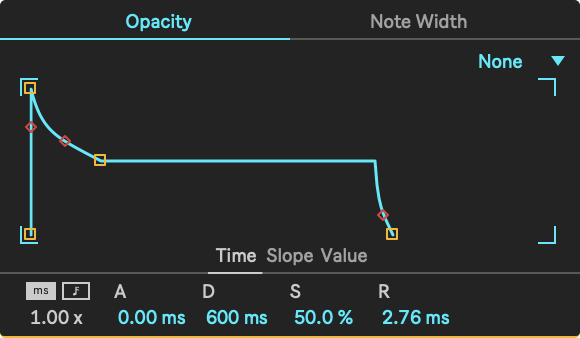
Parameters
- Loop Mode: Sets the looping mode for the envelope.
- None will hold the sustain portion until a note off, and will not loop.
- Trigger will play all segments once a note on is received.
- Loop will loop the entire envelope without holding the sustain, until the voice ends.
- Global Envelope Time Mode: This defines whether envelope times are defined in beats or in milliseconds.
- Global Envelope Time Multiplier: This is a global multiplier for all envelope rates.
Video Simpler
Video Simpler mimics Ableton Live's Simpler instrument. This device allows to easily trigger video content with MIDI notes. For videos that are encoded with anything other than HAP, Video Simpler buffers all frames into the graphics card’s video RAM. The number, length and resolution of movies you can use might be limited depending on your hardware. To lower the memory impact, use the Start and End positions to select a limited range of buffered frames from the loaded video.
For more information on how to mitigate high memory usage with Video Simpler, please refer to this page under Troubleshooting.
Whenever loading a video into Video Simpler, the default End position is the 100th frame, or 3.33 seconds. Hovering over the End parameter will reveal the maximum available frames, as well as the native frame rate of the loaded video. It is possible to define the Start and End positions in Seconds, or in Frames. Seconds, being the default mode, can be used to roughly set a Start and End position, while switching to Frames mode makes it easier to select a very specific Start or End frame.
Simpler's frame display shows the set Start frame by default. While hovering over the End parameter, or while adjusting it, the display will show the End frame.
On Windows, you will need to configure the VIDDLL Max Package in order for Video Simpler to display video previews.
Once Videosync is connected to Live and a video or image was dropped into Simpler, at the bottom of Simpler's display a loading bar will appear, displaying the Start and End positions, as well as the loading progress in between both positions. While hovering the cursor over the Start or End parameters, the corresponding triangular marker in the loading bar will turn white.
While changing the Start and End position parameters, the frame in the display will zoom out, switching from "Scale to fill" to "Scale to fit", to make it possible to see the entire frame. While the display is in "Scale to fill" mode, it's possible to click the display and drag up and down to reveal a desired portion of the visible frame.
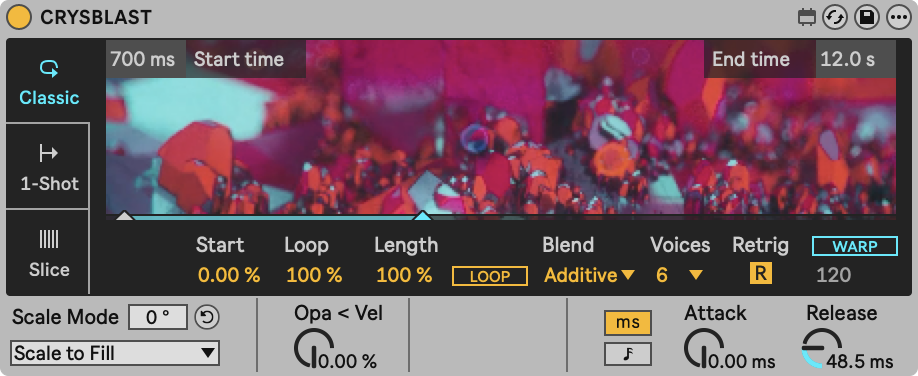
Playback modes
Like Live's Simpler, the Video Simpler also has three playback modes. You can switch playback modes by using the tabs on the left of the device.
- Classic Mode
- 1-Shot Mode
- Slice Mode
- Images
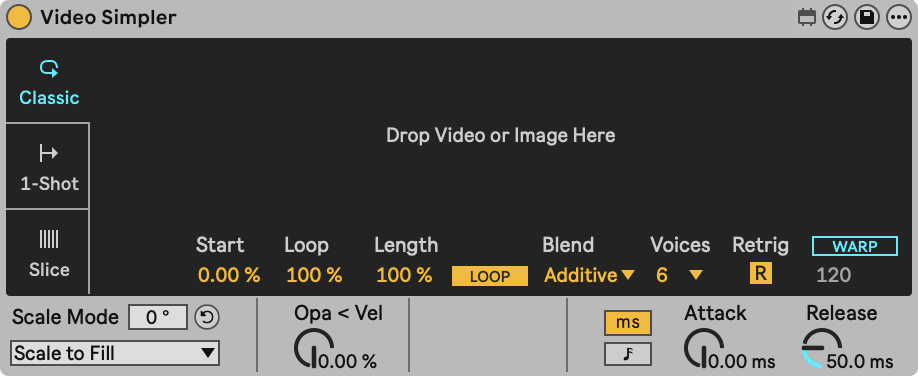
In Classic playback mode, video samples play during a note. This means that, when a note off is received, the release will be triggered. The playback speed depends on the note’s pitch. On note C3, the video plays at default speed. Notes higher or lower than C3 change the playback speed, if the Video Simpler is used alongside Live's audio Simpler in a Rack with equal settings, the video stays in sync with audio.
The Classic playback mode also allows for some looping settings. These behave in the same way as Live's audio Simpler, allowing the video to loop if the note is being held for a longer time than the loop length.
This playback mode works exceptionally well when triggering short video fragments which represent notes played by drums or other instruments.
Parameters
- Start %: The point where video playback will begin, displayed as a percentage of the video's length.
- Loop %: The length of the playback loop, displayed as a percentage of te Length parameter. Only available when Loop button is activated.
- Length %: The length of the video region which Video Simpler can play, displayed as a percentage of the video's length.
- Loop: When enabled, the video will loop when a note is being held.
- Voices: The maximum number of simultaneous voices that Video Simpler will attempt to play.
- Retrig: When enabled, notes which are already playing will be retriggered instead of creating an additional voice.
- Blend: Defines the blend mode used between polyphonic video voices.
- Attack: Fade-in time once a MIDI note is received.
- Release: Fade-out time once a MIDI note is released.

In contrast to Classic playback mode, 1-Shot mode keeps playing the video fragment even after a note has been released. This mode is particularly useful when you don’t have a lot of control over note duration, like when triggering video from electronic drum pads or drum triggers. If Gate is on, the fragment will fade out as soon as the note has been released.
Parameters
- TRIGGER/GATE: When set to trigger, the note off event is ignored. When set to Gate, the video stops playing as soon as the note is released.
- Fade In: Fade-in time once a MIDI note is received.
- Fade Out: Fade-out time once a MIDI note is received, or released in GATE mode.
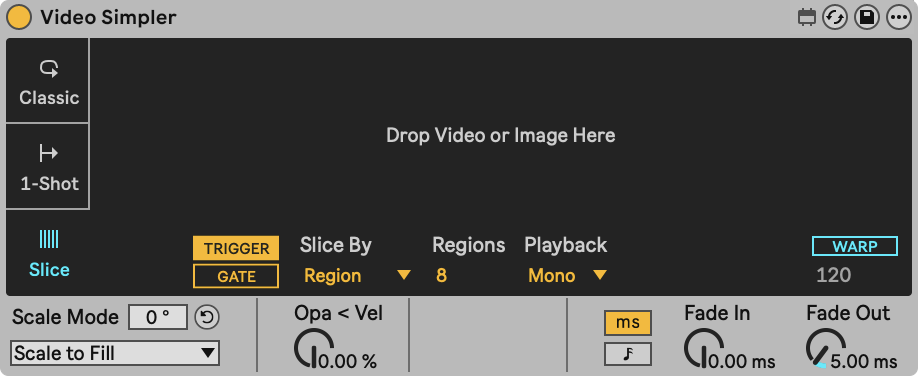
In Slice playback mode, the video fragment is divided into slices that can be triggered individually by MIDI notes. Videosync's Simpler allows for two 'Slice By' options: Beat and Region.
Starting from note C1, notes chromatically upwards trigger the different slices. This playback mode is very interesting to jump to various times in the video fragment quickly.
Parameters
- TRIGGER/GATE: When set to trigger, the note off event is ignored. When set to Gate, the video stops playing as soon as the note is released.
- Slice By: Regions Slide Mode divides the video up into equal length regions. Beat slices the video into slices of exactly the length of the defined beat.
- Division: The length of each slice, in beats.
- Regions: The number of regions the video will be divided in.
- Playback: When set to Mono and a MIDI note is played, the slice will play until reaching the next slice. When set to Thru and a MIDI noted is played, the video keeps playing beyond the initial length of the slice, until it reaches the end of the video. When set to Freeze and a MIDI note is received, the video will play for the length of the slice and then freeze on the last frame of the slice until the MIDI note is released.
- Fade In: Fade-in time once a MIDI note is received.
- Fade Out: Fade-out time once a MIDI note is received, or released in GATE mode.

Whenever an image is loaded into Video Simpler, a number of parameters become disabled and it is no longer possible to access Slice mode. As Video Simpler is primarily a video instrument, Videosync creates a phantom video with a max length of 600 frames for the loaded image. When a MIDI note is triggered, the image's phantom video will play back at 30 fps, resulting in a maximum length of 20 seconds.
If 20 seconds still isn't long enough while in Classic mode, activating Loop will allow for the image's phantom video to match the length of any envelope. Once a note off message is received, Release sets in, and the image will fade out. In contrast to Classic playback mode, 1-Shot mode keeps playing the phantom video even after a note has been released, but no longer than the maximum of 600 frames/20 seconds.
The following file extensions are supported for images: .jpg, .png, .svg.
Parameters
- Loop: When enabled, the image's phantom video can loop indefinitely.
- Blend: Defines the blend mode used between polyphonic voices.
- Voices: The maximum number of simultaneous voices that Video Simpler will attempt to play.
Common Parameters
- Stretch Mode: Defines the scaling mode for the video in Video Simpler.
- Scale to Fit scales the video to fit exactly in the window while keeping the original aspect ratio.
- Scale to Fill scales up the video to completely cover the window while still respecting the original aspect ratio.
- Stretch to Fill stretches the video to completely fill the window, not respecting original aspect ratio.
- Original does not scale or stretch the video in anyway.
- Rotate: Rotates the loaded video in steps of 90 degrees.
- Opa < Vel: Video Simpler's opacity can be modulated by the velocity of incoming MIDI notes. This determines the depth of modulation.
- WARP: When enabled, the video changes playback speed depending on the Live Set's BPM. This can be useful to keep rhythmical videos in sync, but also to speed up or slow down videos.
- WARP BPM: Sets the video's BPM and defines how the Live Set's BPM influences Video Simpler's playback speed.
- Ms/Beats: Toggles the opacity envelope between beat synced and time-based (ms).
Audiovisual playback
Videosync's Simpler only outputs video, even when a video file has audio in it. To output audio as well, group the Video Simpler into an Instrument Rack and add a second chain for the standard audio Simpler with the same video file in it. Similarly you can insert this new Instrument Rack into a Drum Rack to play multiple video and audio clips on the same track.