Building plugins
Introduction
To keep the entry barrier low, the default instruments that come with Beam do not cover all fixture types or fixture parameters. But to accomodate more advanced users, we put significant effort into making it as easy as possible to create your own Beam instruments.
This section of the manual assumes that you are familiar with the basics of Max for Live development and that you have read Signal flow.
Setting up
All elements you need to make an instrument can be found when you open an existing plugin for editing and unfreeze it.
After unfreezing a Beam plugin, you will find the abstractions that it uses in the Documents/Max 8/Max for Live devices folder. You can copy any dependency you want to use to another folder of your choosing. We then advise to remove the Max for Live devices folder entirely to prevent confusion over which copy of the abstractions you are using.
Overview of a plugin
Let's have a look at the Par plugin:
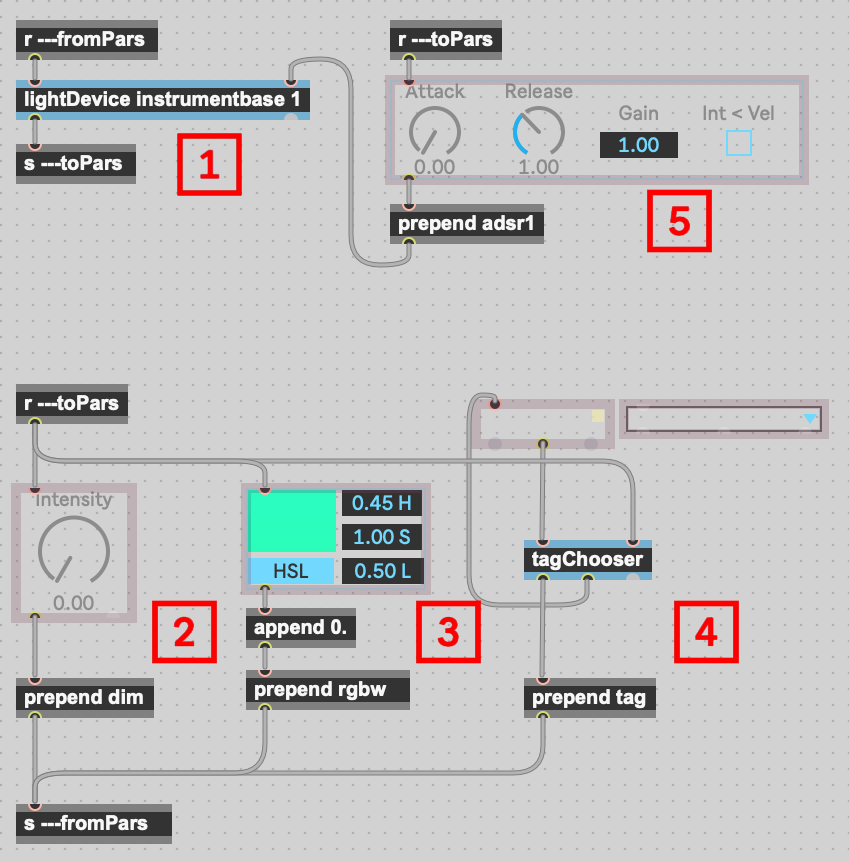
These are the highlighted elements:
- The most important element is the lightDevice abstraction. This communicates all necessary changes to and from Beam.
- The simplest way to control a parameter is to create a live.x control object and prepend its output with the parameter name, like
dim,panortilt. The parameter names are ultimately defined in the fixture profiles. - There is one special parameter tag:
rgbw, always followed by 4 float values. When Beam receives this, it controls thered,green,blueand optionallywhiteparameters defined in a LED fixture profile orcyan,magentaandyellow, that are defined in fixture profiles with continuous color wheels. The instruments that support color come with a colorpicker abstraction that you can use to easily output color values based on HSL and/or RGB controls. - Another essential element is the tagChooser abstraction, hooked up to the dropdown object, and its output prepended with the
tagkeyword. The dropdown, when connected to the tagChooser abstraction, is automatically updated when Beam signals changes to the patch list. - Most included instruments contain a
dimenvelope. Have a look inside the abstraction to find out how to adapt this envelope for any parameter.
Controlling individual fixtures or groups of fixtures in a tag
You can control individual fixtures or groups of fixtures within the selected tag by sending lists of values prepended by a modulation parameter name (like dim, pan or tilt) to the lightDevice abstraction. The number of values in a list is distributed across the number of fixtures in a tag:
- If you select a tag with 10 fixtures and have 10 values in a list, e.g.
dim 0.1 0.2 0.3 0.4 0.5 0.6 0.7 0.8 0.9 1.0, each value will control 1 fixture. - If you select a tag with 10 fixtures and have 2 values in a list, e.g.
dim 0.1 0.9, each value will control 5 fixtures. - If you select a tag with 10 fixtures and have 5 values in a list, e.g.
dim 0.2 0.4 0.6 0.8 1.0, each value will control 2 fixtures.
That's all you need
That's it! You should have all you need to try out crazy combinations of parameters within a single plugin, to add custom parameters (that you have also added to your fixture files), or to build new interfaces that control, and maybe link parameters together.
Polishing for distribution
There are two valuable resources to use when you consider distributing your plugins:
- The Videosync custom plugin freezing tips.
- The Max for Live Production Guidelines