Adding premapped channels
While each lighting fixture may implement its own unique DMX channel layout, many standard channel types are common to most fixtures. Rather than manually configuring these common channels and their corresponding mappings each time you create a profile, the Fixture Editor provides a number of ready-made presets for frequently used channels. Using these presets makes the process of creating fixture profiles both more efficient and consistent.
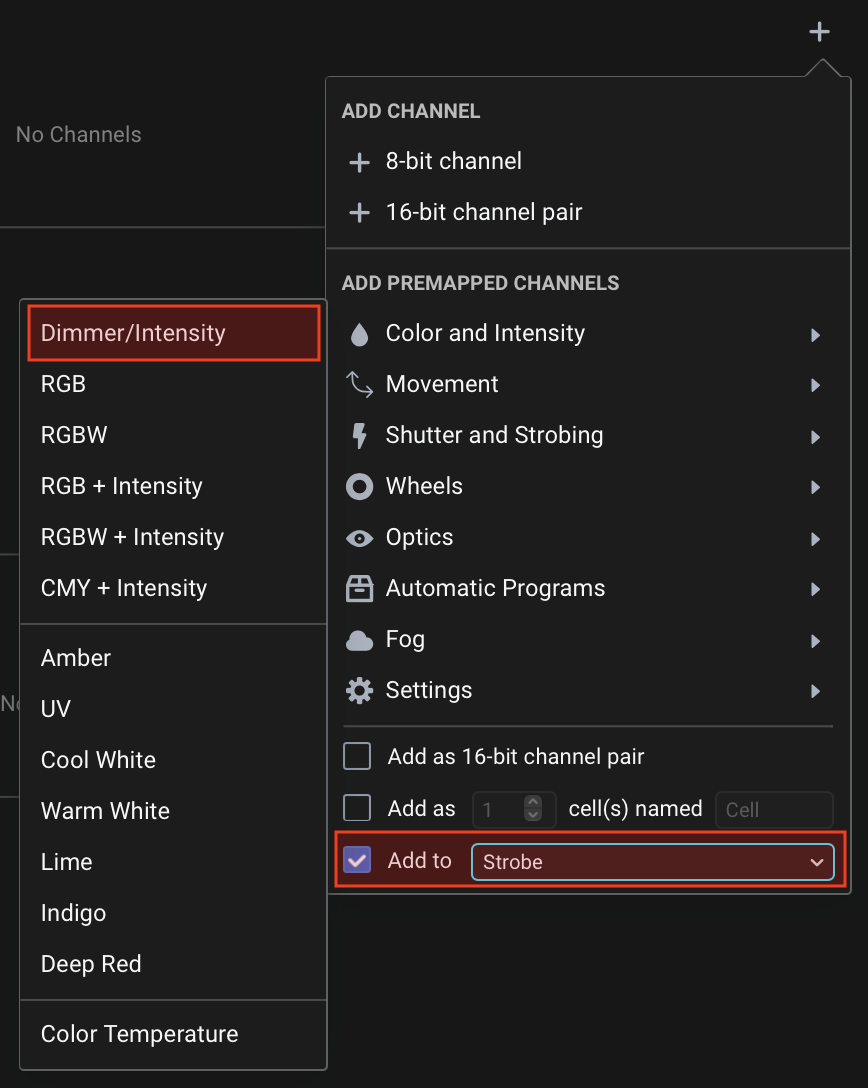
You can access these presets through the Add Premapped Channels section in the Add Channels menu, which you can open by clicking the + button at the top right of a Mode's Channels section:
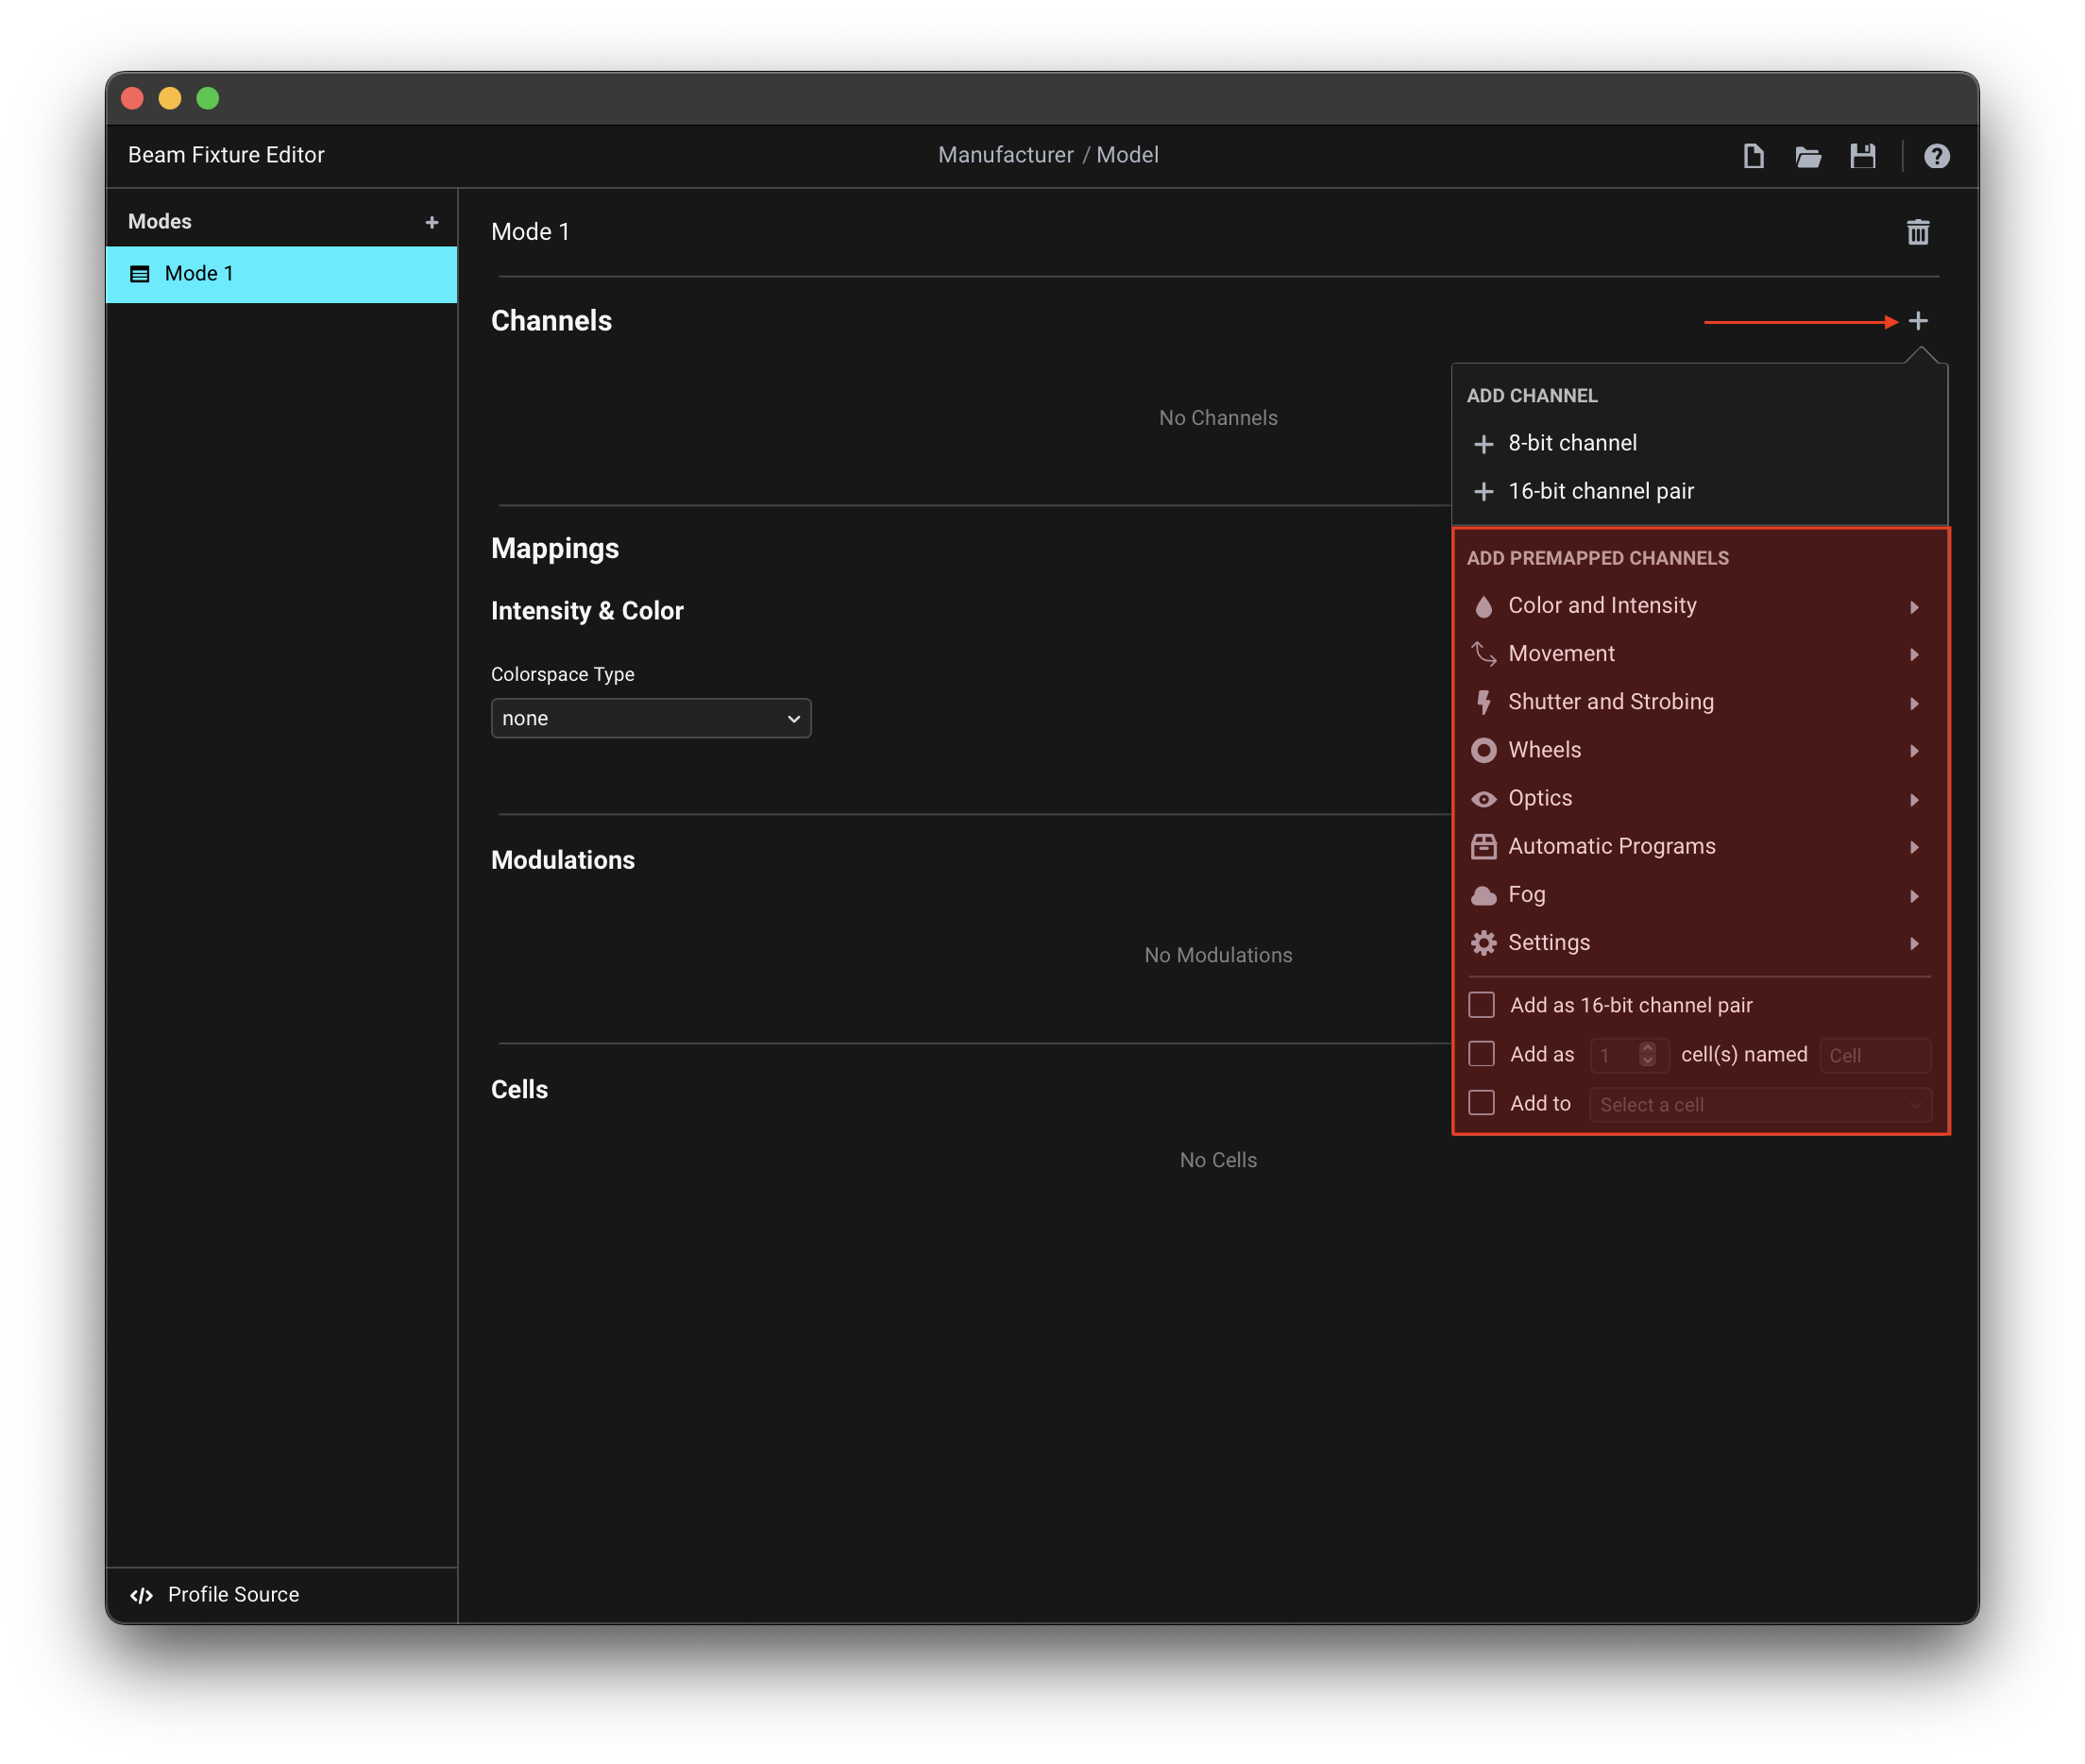
Clicking on an option in one of the sub-menus adds one or more Channels with pre-filled channel properties, along with relevant Mappings referencing the added Channels.
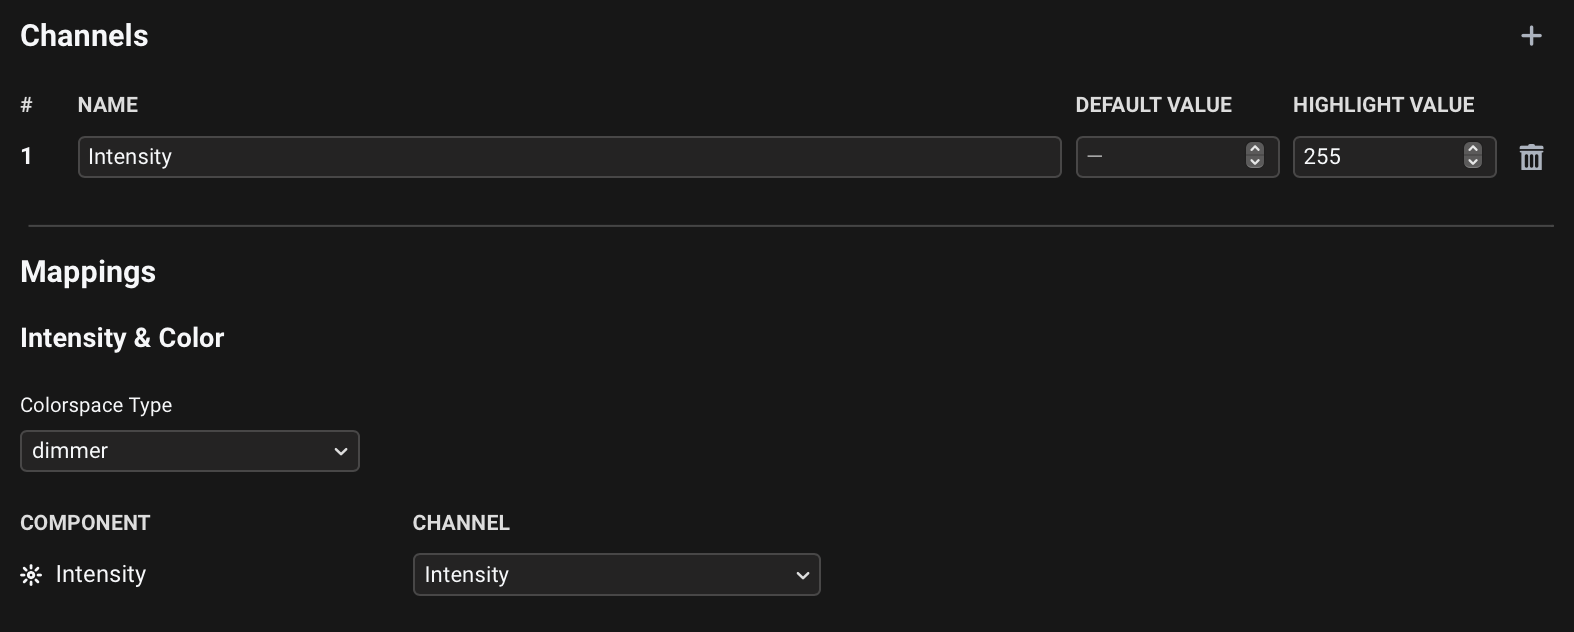
- Example 1: Dimmer/Intensity
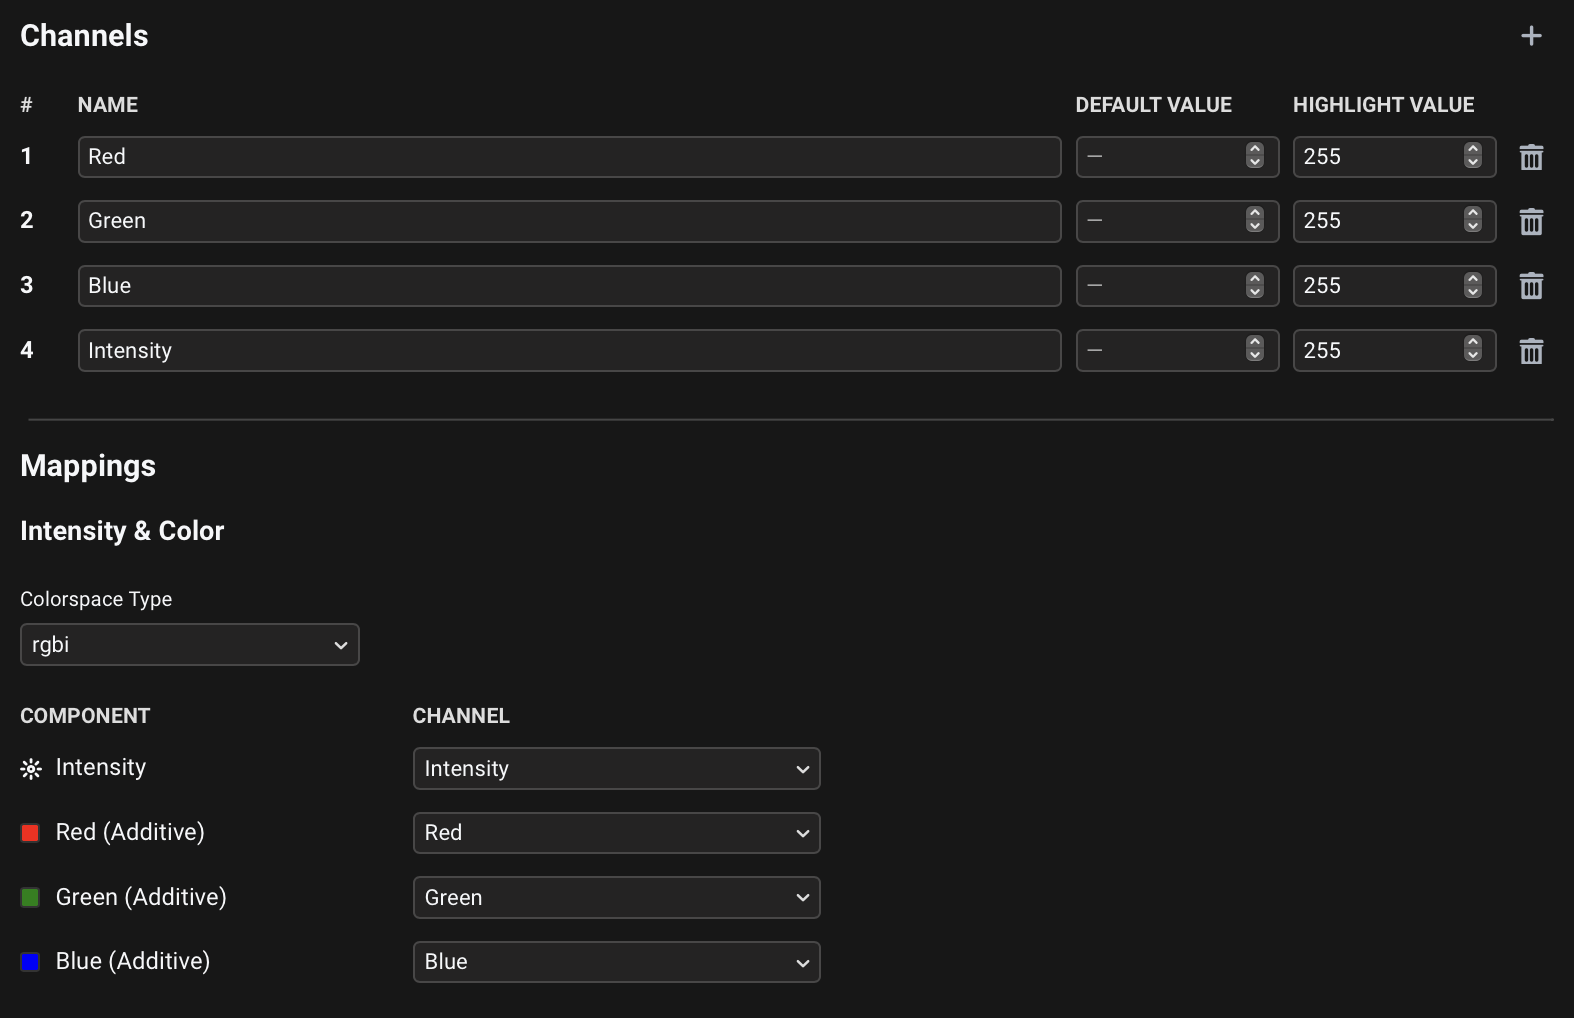
- Example 2: RGB + Intensity
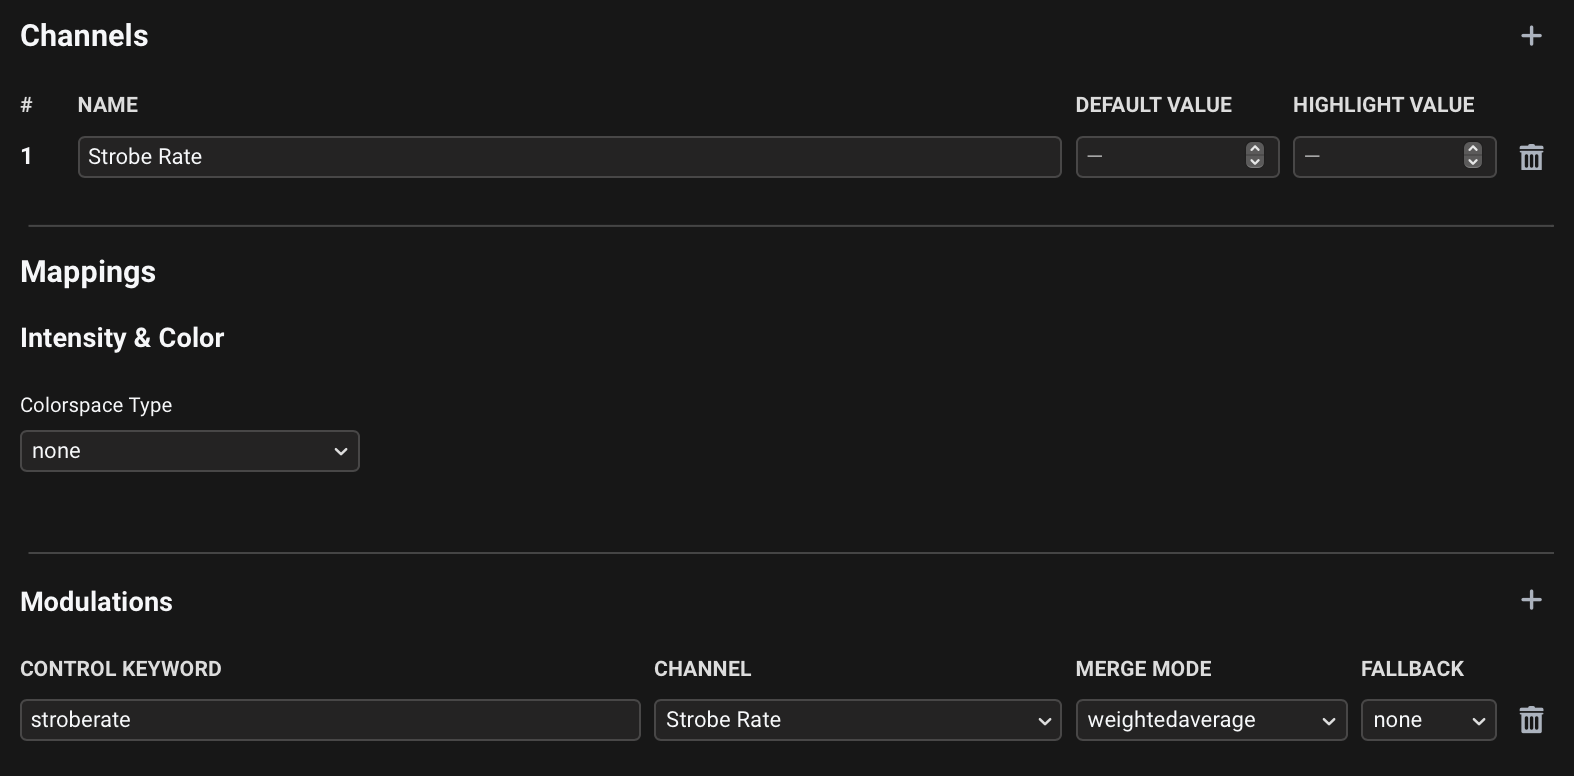
- Example 3: Strobe Rate
The Color and Intensity > Dimmer/Intensity preset adds an Intensity channel with a Highlight Value 255 (to ensure the fixture lights up when Test is active for it in the Fixture Patch) and maps it under the Intensity & Color as the Intensity component of the dimmer Colorspace Type.
The Color and Intensity > RGB + Intensity preset adds Red, Green, Blue and Intensity channels with Highlight Values 255 (to ensure the fixture lights up when Test is active for it in the Fixture Patch) and maps them under the Intensity & Color as the components of the rgbi Colorspace Type.
The Shutter and Strobing > Strobe Rate preset adds a Strobe Rate channel and maps it as a stroberate Modulation with the weightedaverage Merge Mode.
16-bit channel pairs
If your fixture's DMX channel list contains 16-bit coarse/fine channel pairs, you can add premapped channels as such by enabling the Add as 16-bit channel pair checkbox before adding a channel preset:
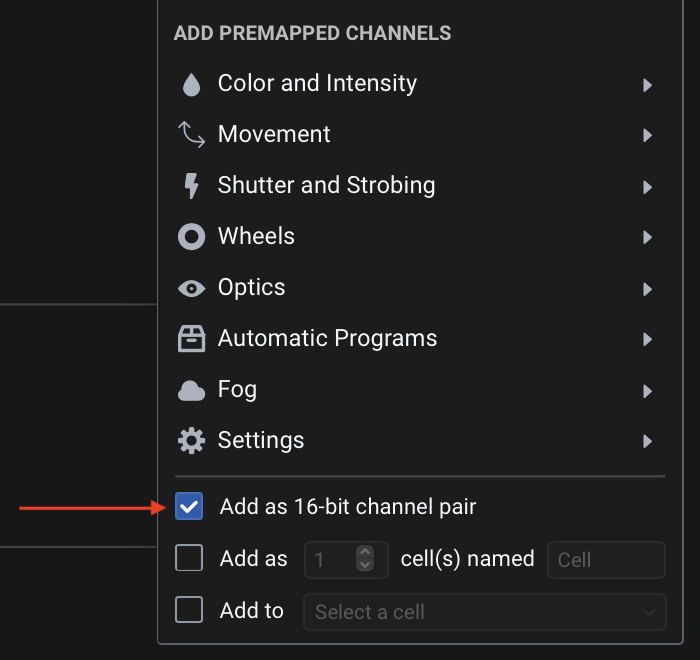
- Example: 16-bit Pan & Tilt
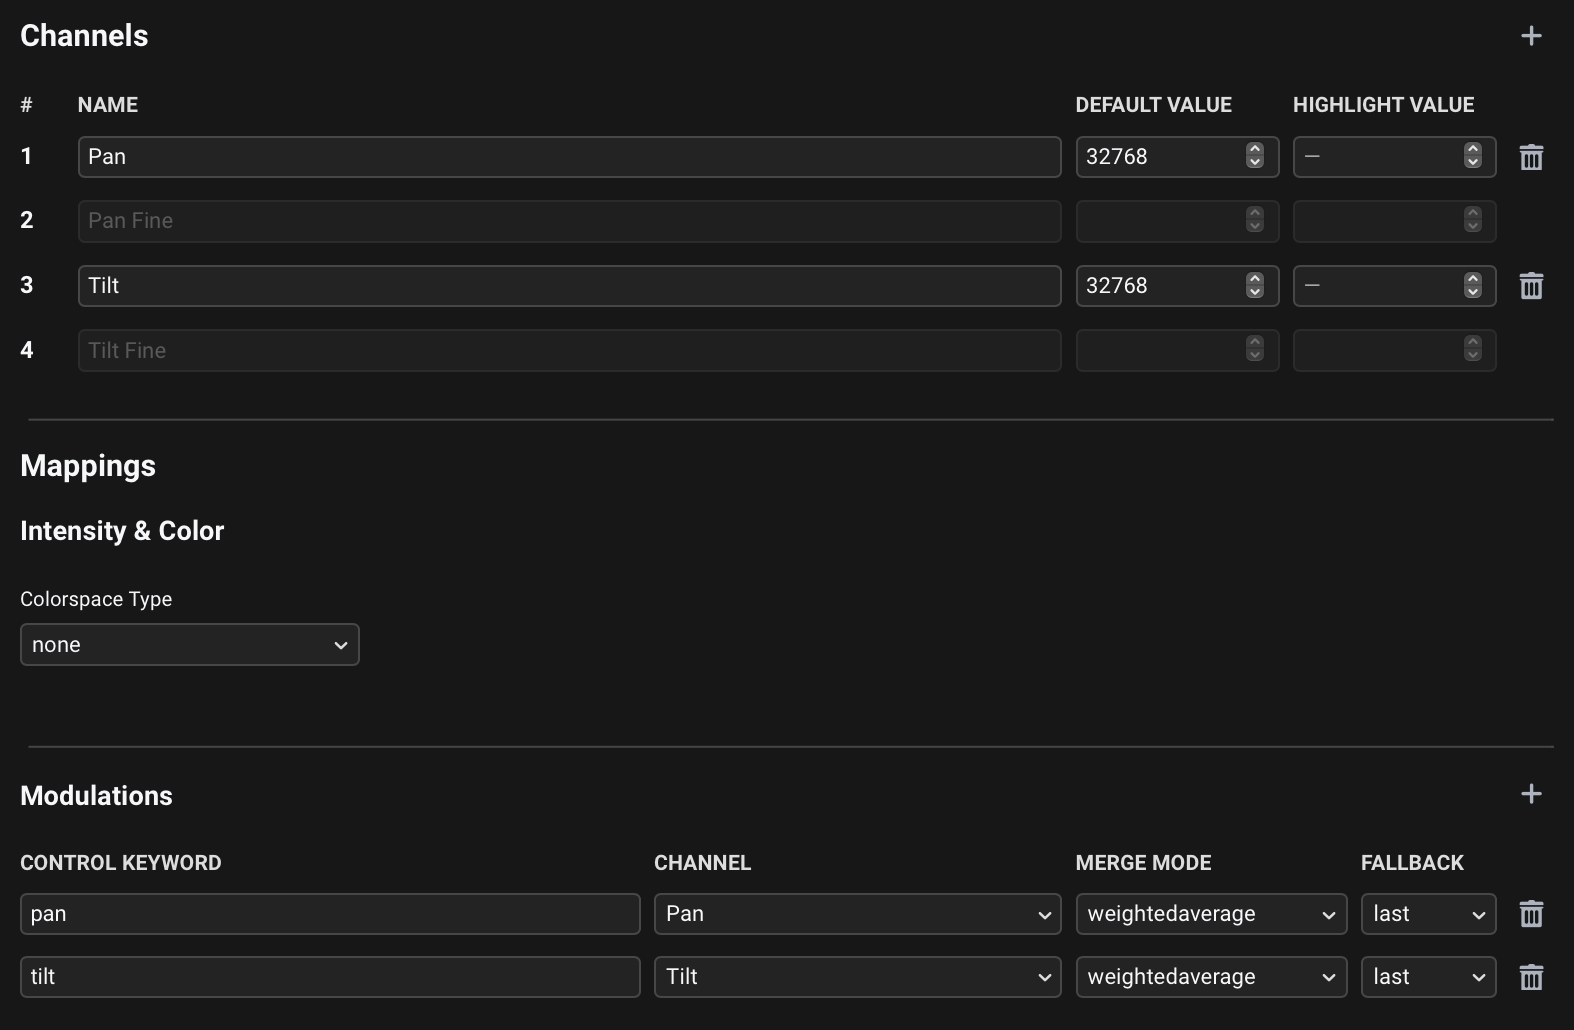
With Add as 16-bit channel pair enabled, The Movement > Pan & Tilt preset adds 4 channels in total - Pan, Pan Fine, Tilt and Tilt Fine.
The Default Values of the two main/coarse channels are 32768 - half of the 16-bit channel range, to ensure the fixture is centered in its default position.
The channels are mapped as pan and tilt Modulations with weightedaverage Merge Mode and last Fallback.
Cells
A scenario in which the Add Premapped Channels is perhaps the most time-saving is when working with fixtures with Cells - multiple individually addressable segments with repeating sequences of channels.
Add as Cells
We can add a channel or a sequence of channels that repeats multiple times in one go, by enabling the Add as N cell(s) named X , where N refers to the number of times we want a channel preset to repeat, and X is the name prefix of the Channels and Cells that will be added:
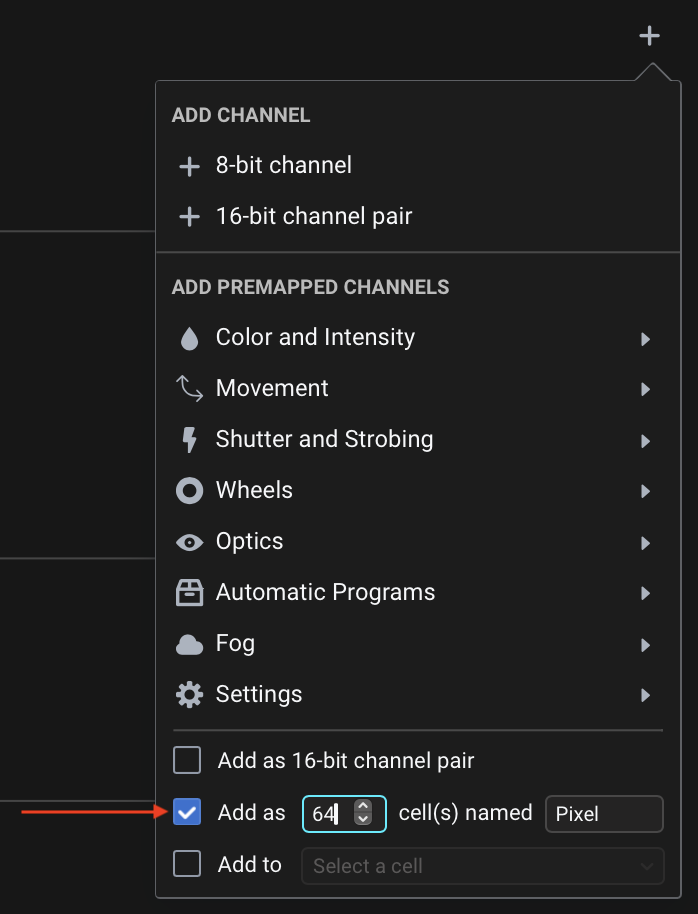
- Example: 3-pixel RGB fixture
We can add Channels and Mappings for a 9-channel / 3-pixel RGB fixture by using the Add as 3 cell(s) named "Pixel" setting and selecting the Color and Intensity > RGB preset:
This adds 9 channels in total - a sequence of Red, Green and Blue channels repeated 3 times, with corresponding Pixel 1-3 prefixes in their names. Each set of R/G/B channels is also mapped as a corresponding Cell.
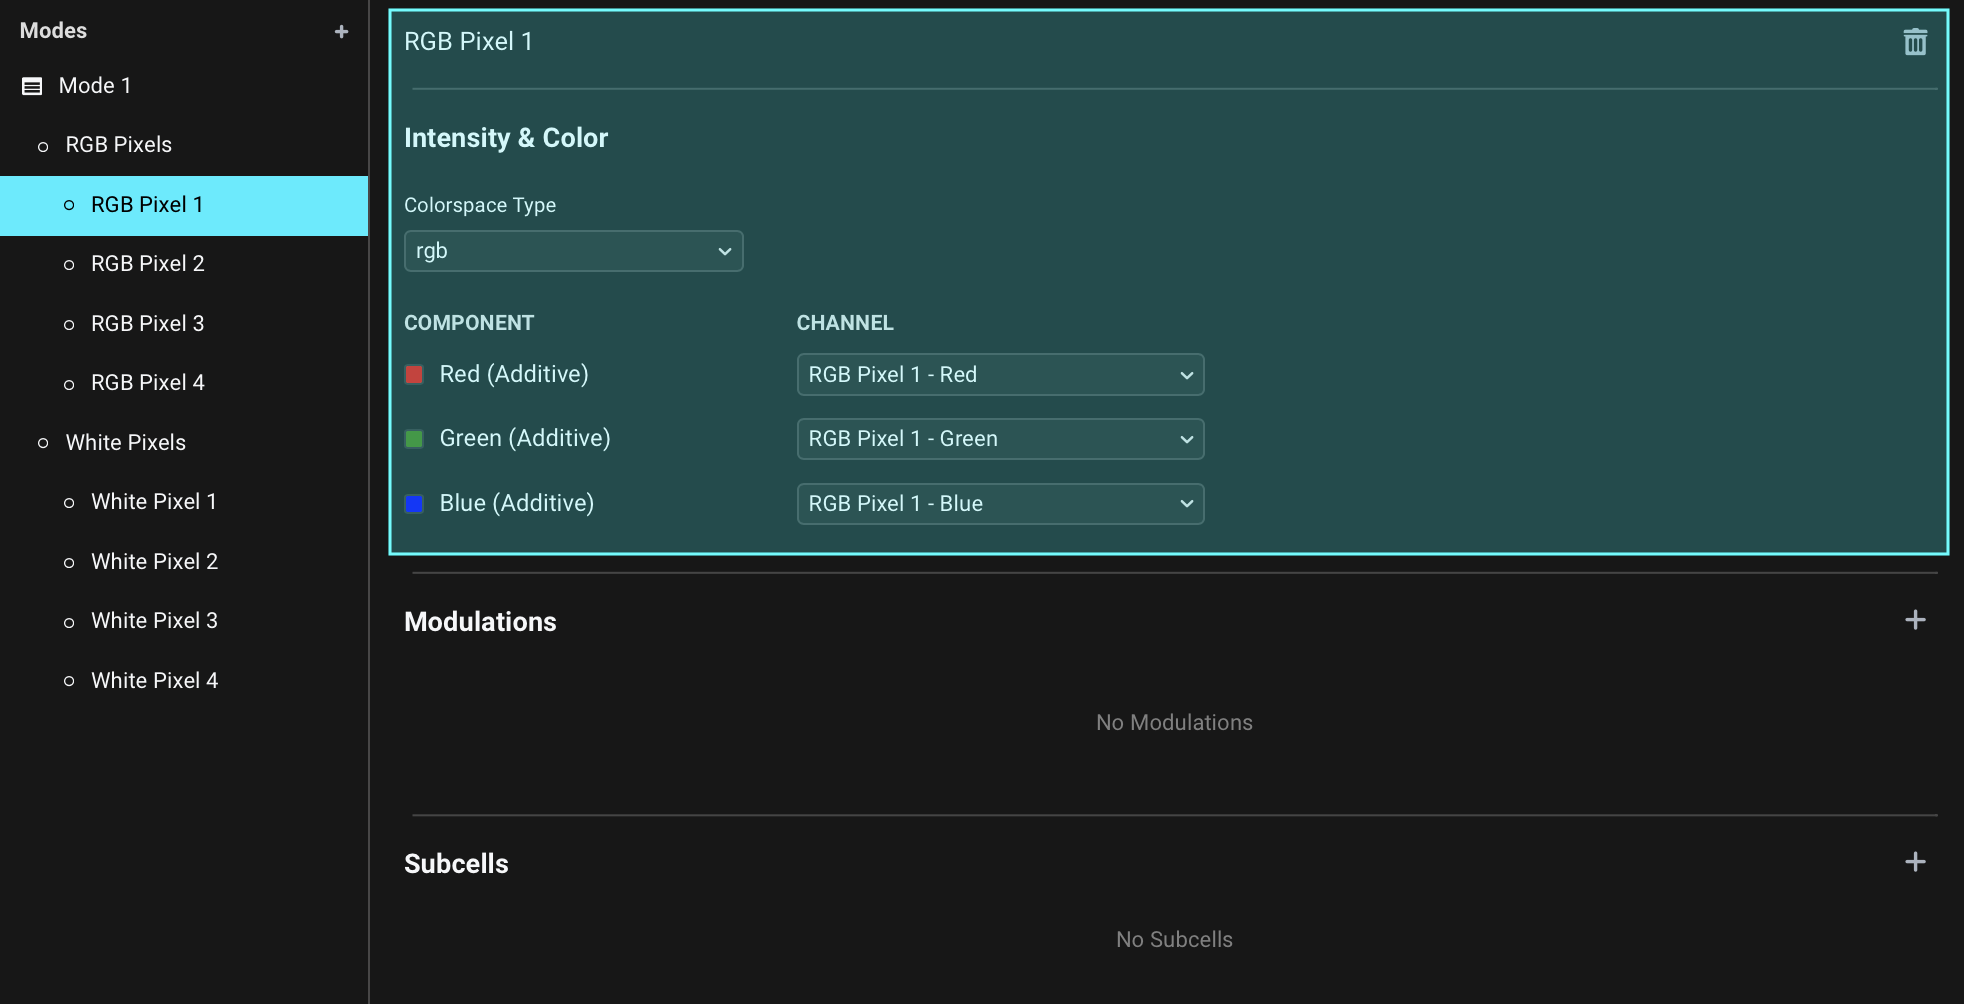
Each Cell maps its corresponding Red, Green and Blue channels as components for Colorspace Type rgb .
Adding to a set of existing Cells
You might encounter a repeating DMX channel sequence that consists of more than one channel type, requiring a combination of multiple channel presets.
You can add additional premapped channels to an already existing set of Cells by enabling Add as N cell(s) named X and once again setting it to the amount and name prefix of the already existing Cells to which you want to add the Mappings for the channels that will be added.
- Example: 3-pixel RGB + Strobe Rate fixture
We have an LED strip with 3 pixels, with a set of Red, Green, Blue, Strobe Rate channels for each pixel. Using the Add as 3 cell(s) named "Pixel" setting, choose Color and Intensity > RGB:
As already seen in the previous example, this creates Red, Green and Blue channels for Pixel 1-3 and adds Cells Pixel 1-3.
Using the Add as 3 cell(s) named "Pixel" setting again, choose Shutter and Strobing > Strobe Rate:
This adds 3 Strobe Rate channels and adds corresponding stroberate modulations to each of the Pixel 1-3 Cells:
We now have first all the 3 sets of RGB channels and then 3 Strobe Rate channels. Assuming that a Strobe Rate channel for a pixel comes right after each pixel's Blue channel, we still need to manually move all the Strobe Rate channels to the correct channel number positions, to get to the following channel layout:
Adding to an existing Cell
You can also add premapped channels to a single Cell only, by enabling the Add to "Cell" checkbox and selecting the target Cell you want to add to, then choosing the channel preset to add:
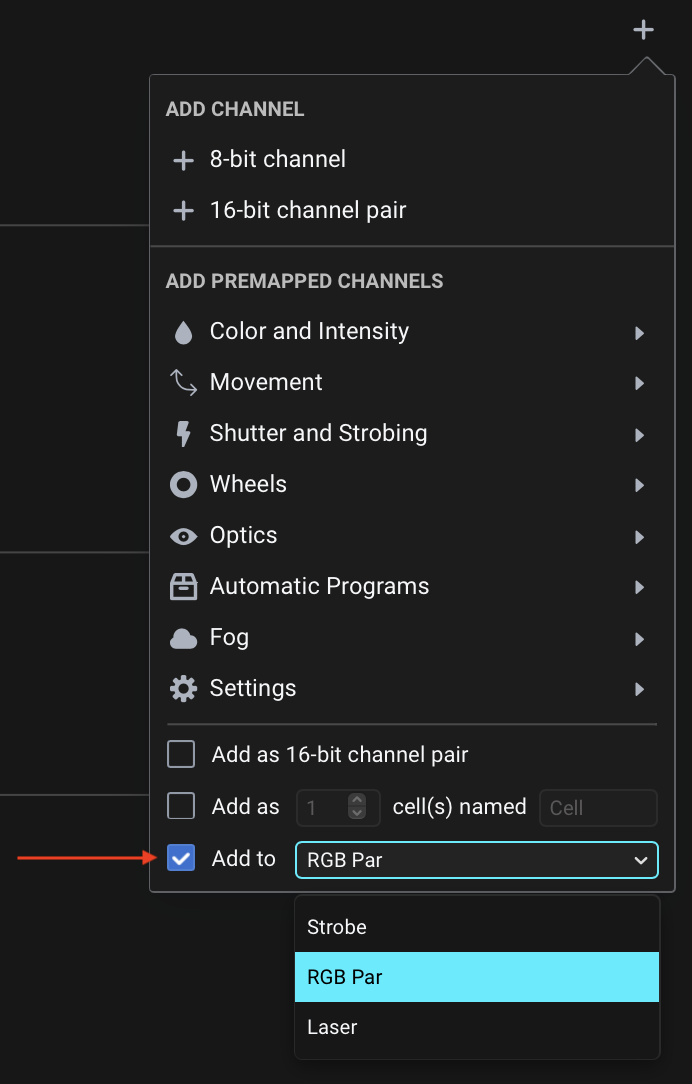
- Example: Multi-type aggregate fixture
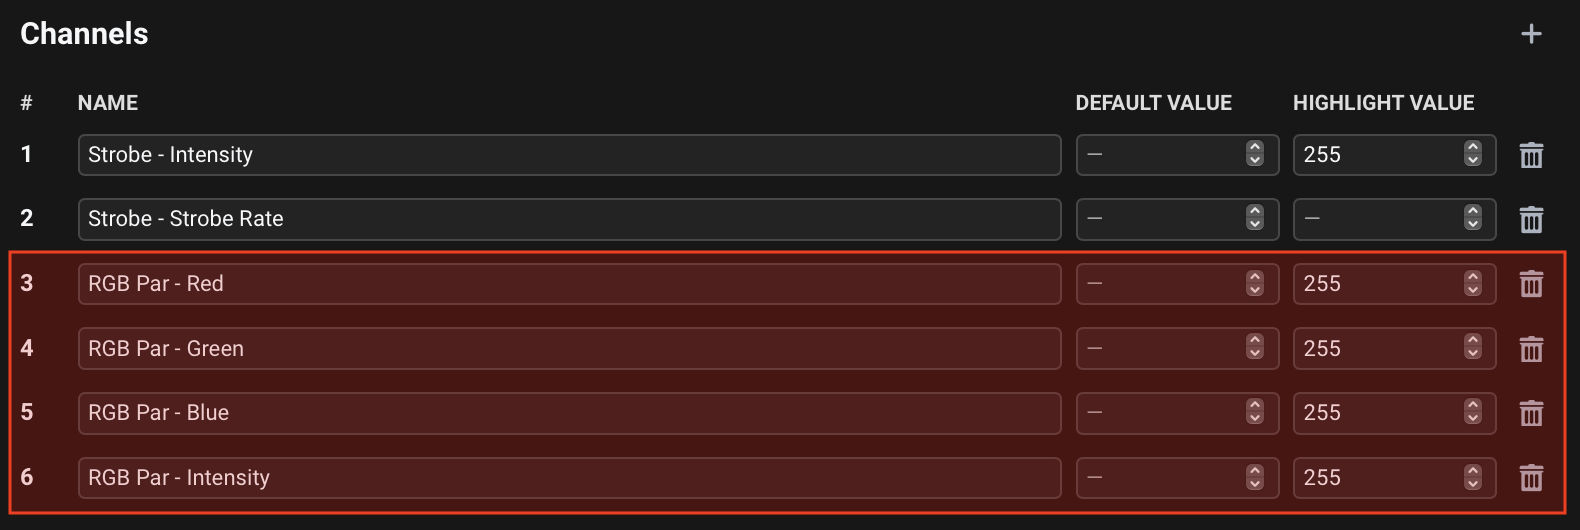
You have a fixture that combines a white-only strobe, an RGB Par light and a laser in one unit. Each part of the fixture can be independently addressed through its own set of channels that partly vary in type - e.g. strobe has Intensity and Strobe Rate channels, the LED Par light has Intensity, Red, Green, Blue channels, and the laser has a Program and Strobe Rate channel.
In such a scenario it makes sense to create a Cell for each lighting source of the fixture aggregate - Strobe, RGB Par, Laser. This way each Cell can have its own independent set of Mappings.

We can then add premapped channels for each Cell and make sure that Mappings are assigned to the appropriate Cells.
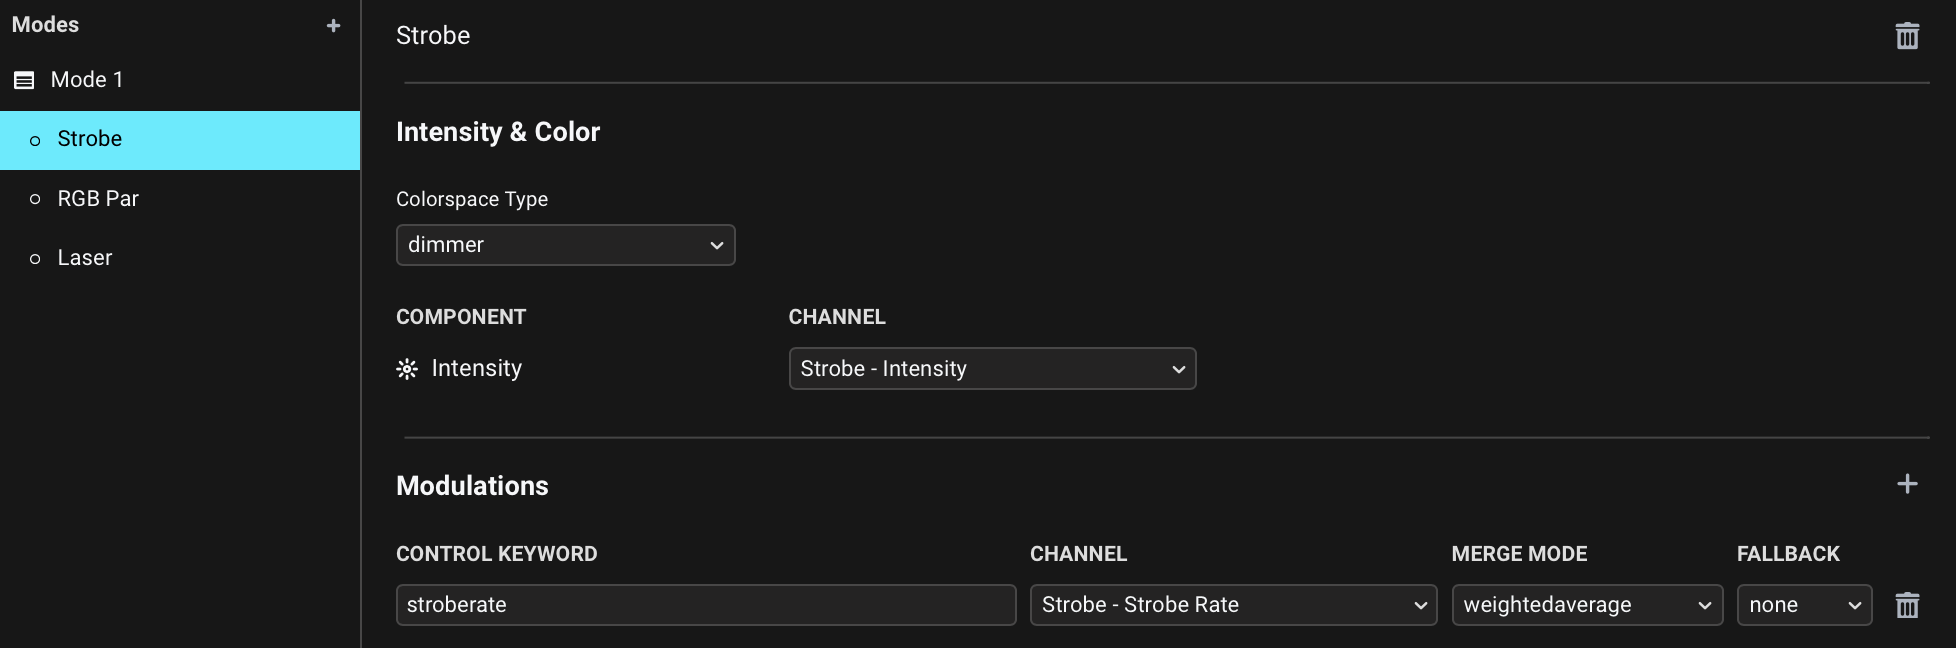
Using the Add to "Strobe" setting, add Color and Intensity > Dimmer/Intensity and Shutter and Strobing > Strobe Rate.
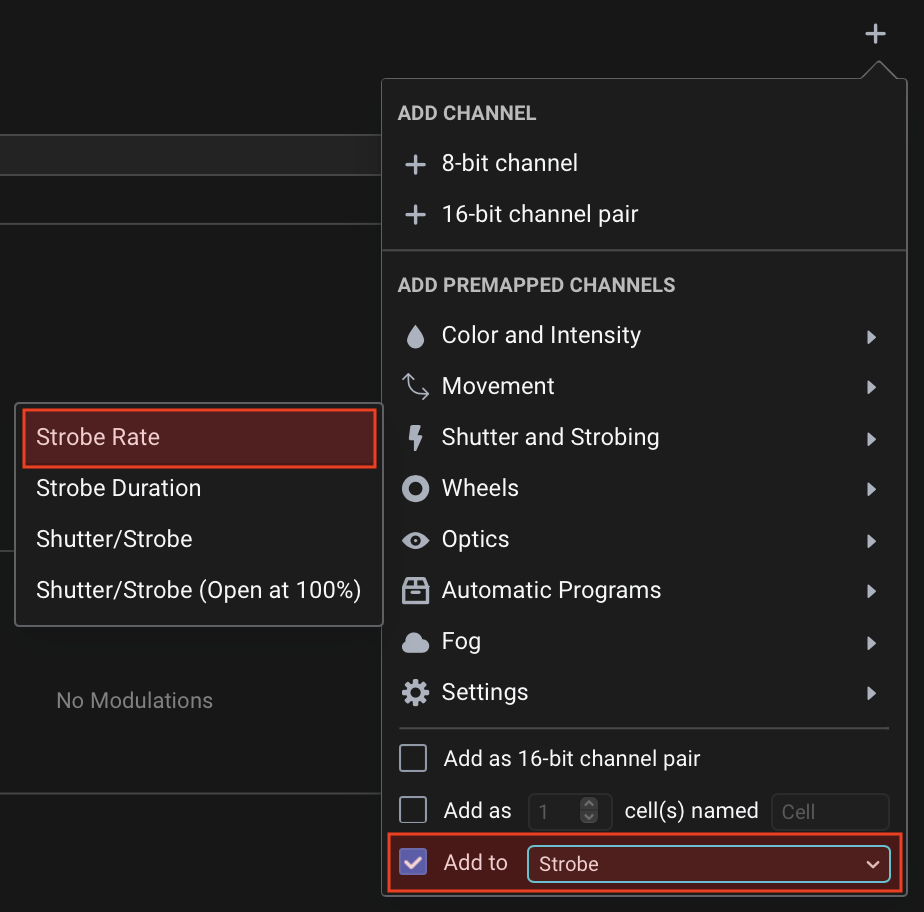
This adds the channels, sets Strobe cell Colorspace Type to dimmer and adds stroberate modulation to it.

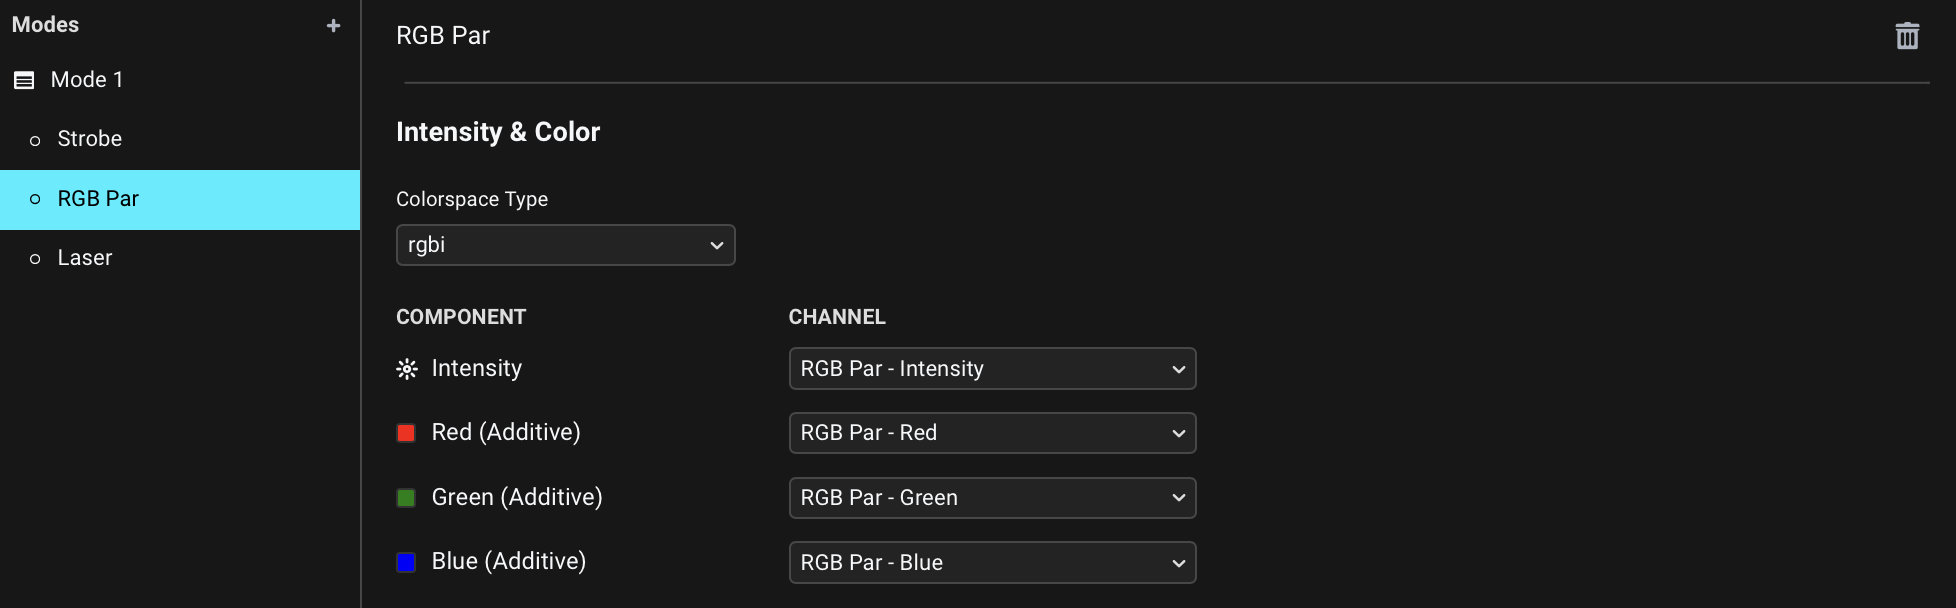
Using the Add to "RGB Par" setting, add Color and Intensity > RGBI.
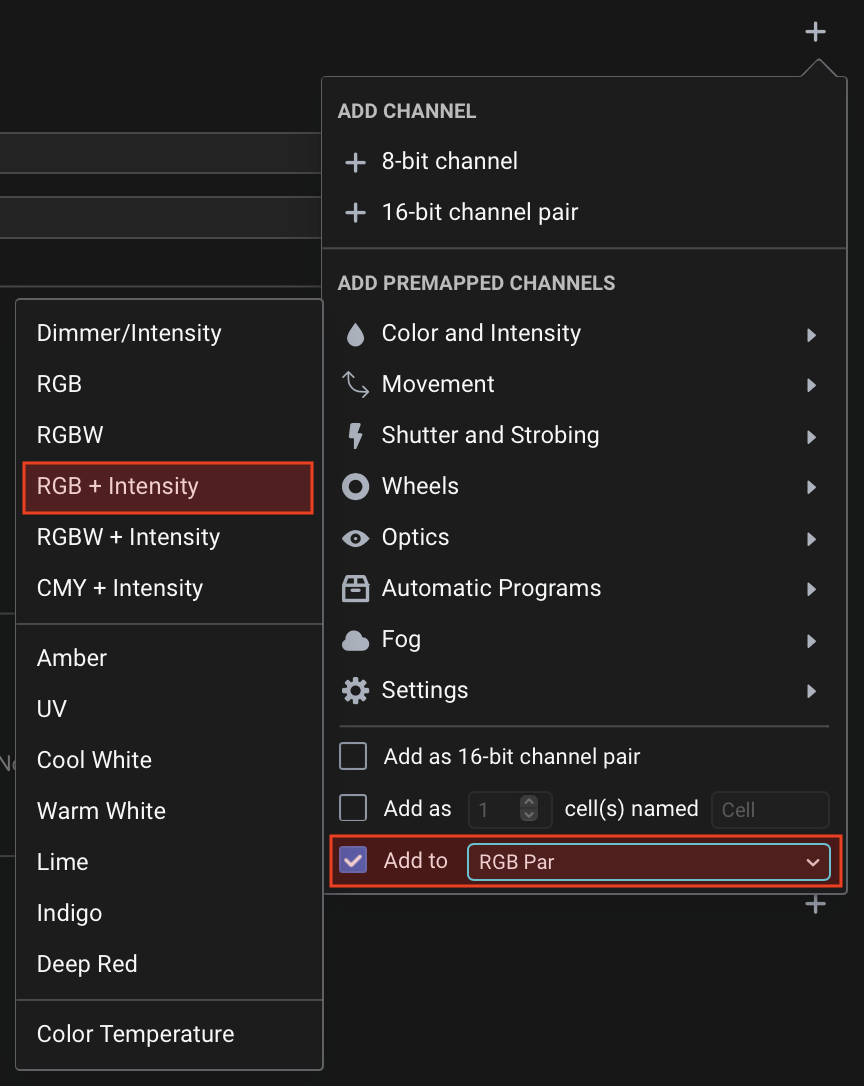
This adds the channels and sets RGB Par cell Colorspace Type to rgbi.
Using the Add to "Laser" setting, add Automatic Programs > Program and Shutter and Strobing > Strobe Rate.
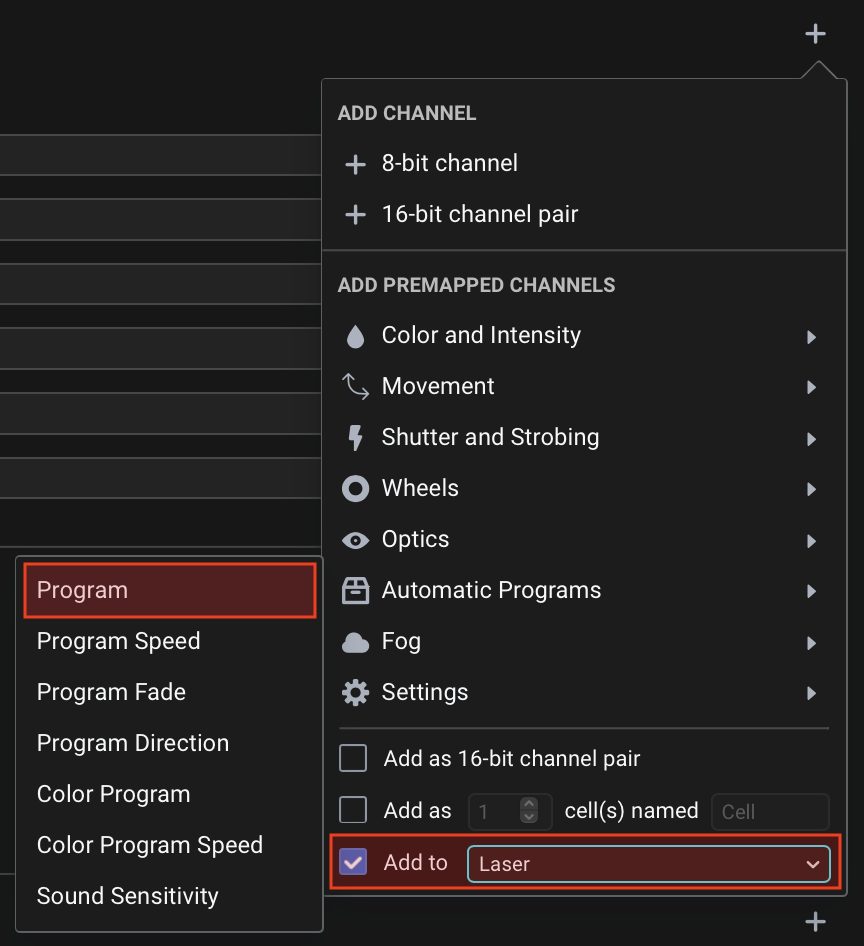
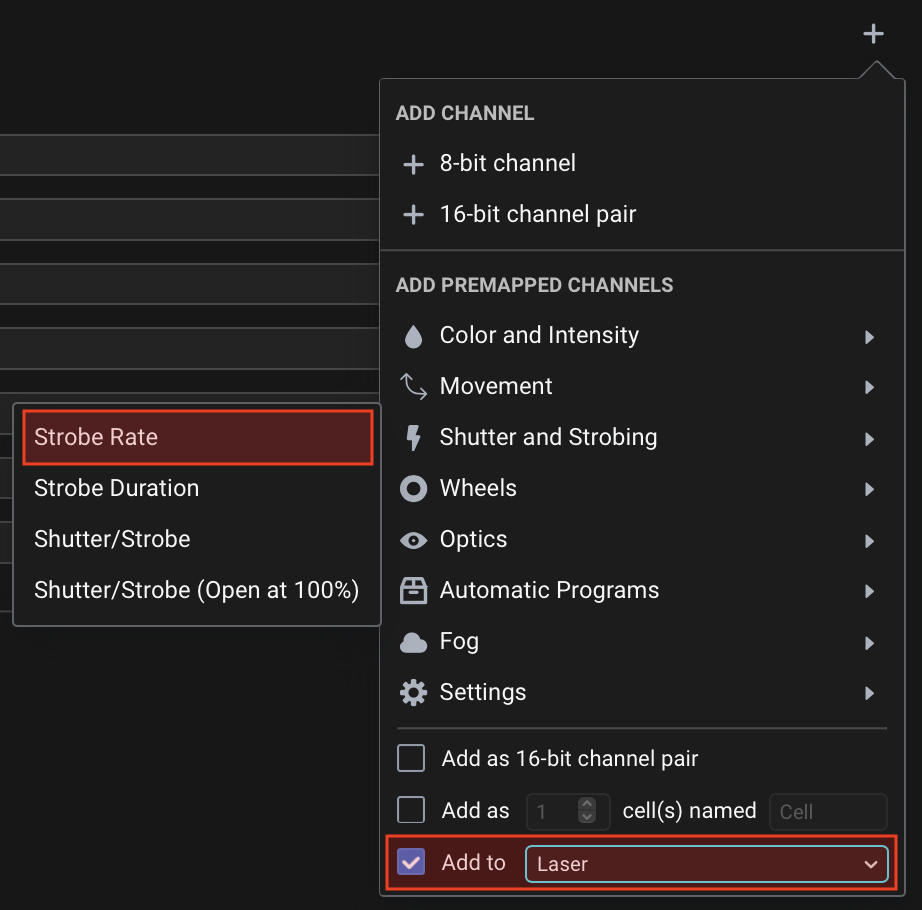
This adds the channels and adds program and stroberate modulations to the Laser cell.

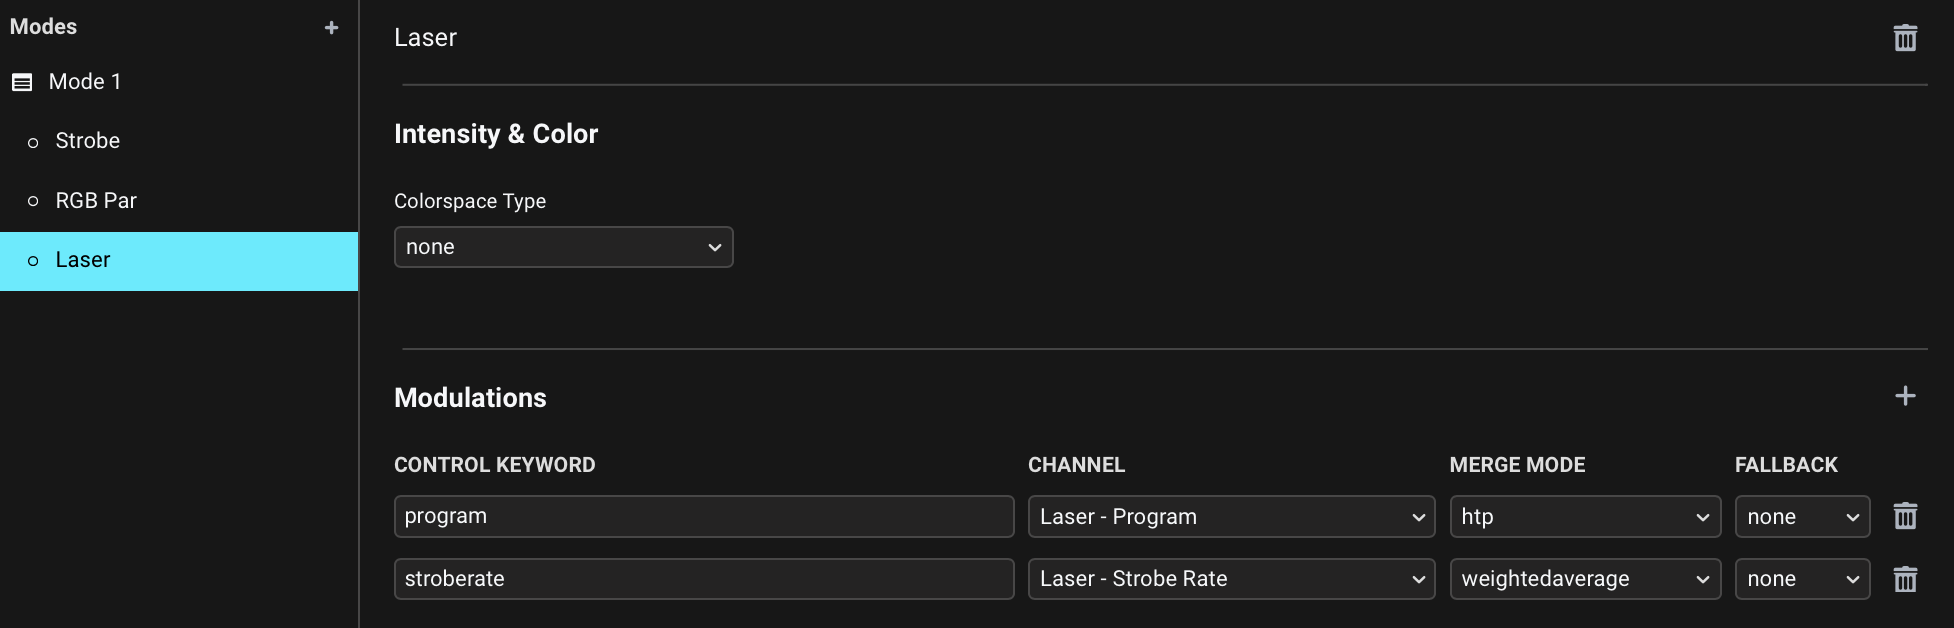
As the laser in this fixture aggregate doesn't have any channels that would allow for controlling intensity or color-mixing of the light, the Colorspace Type remains none.
Adding Subcells to Cells
A combination of Add to "Cell" and Add as N cell(s) named X features allows you to add a range of channels mapped as Subcells of the selected target Cell:
This is relevant for fixtures that have several different sections, that each by themselves have individually addressable sub-sections.
- Example: Fixture with multiple Cell sections with Subcells
- Fixture base Mappings
- Cell section Mappings
- Subcell Mappings
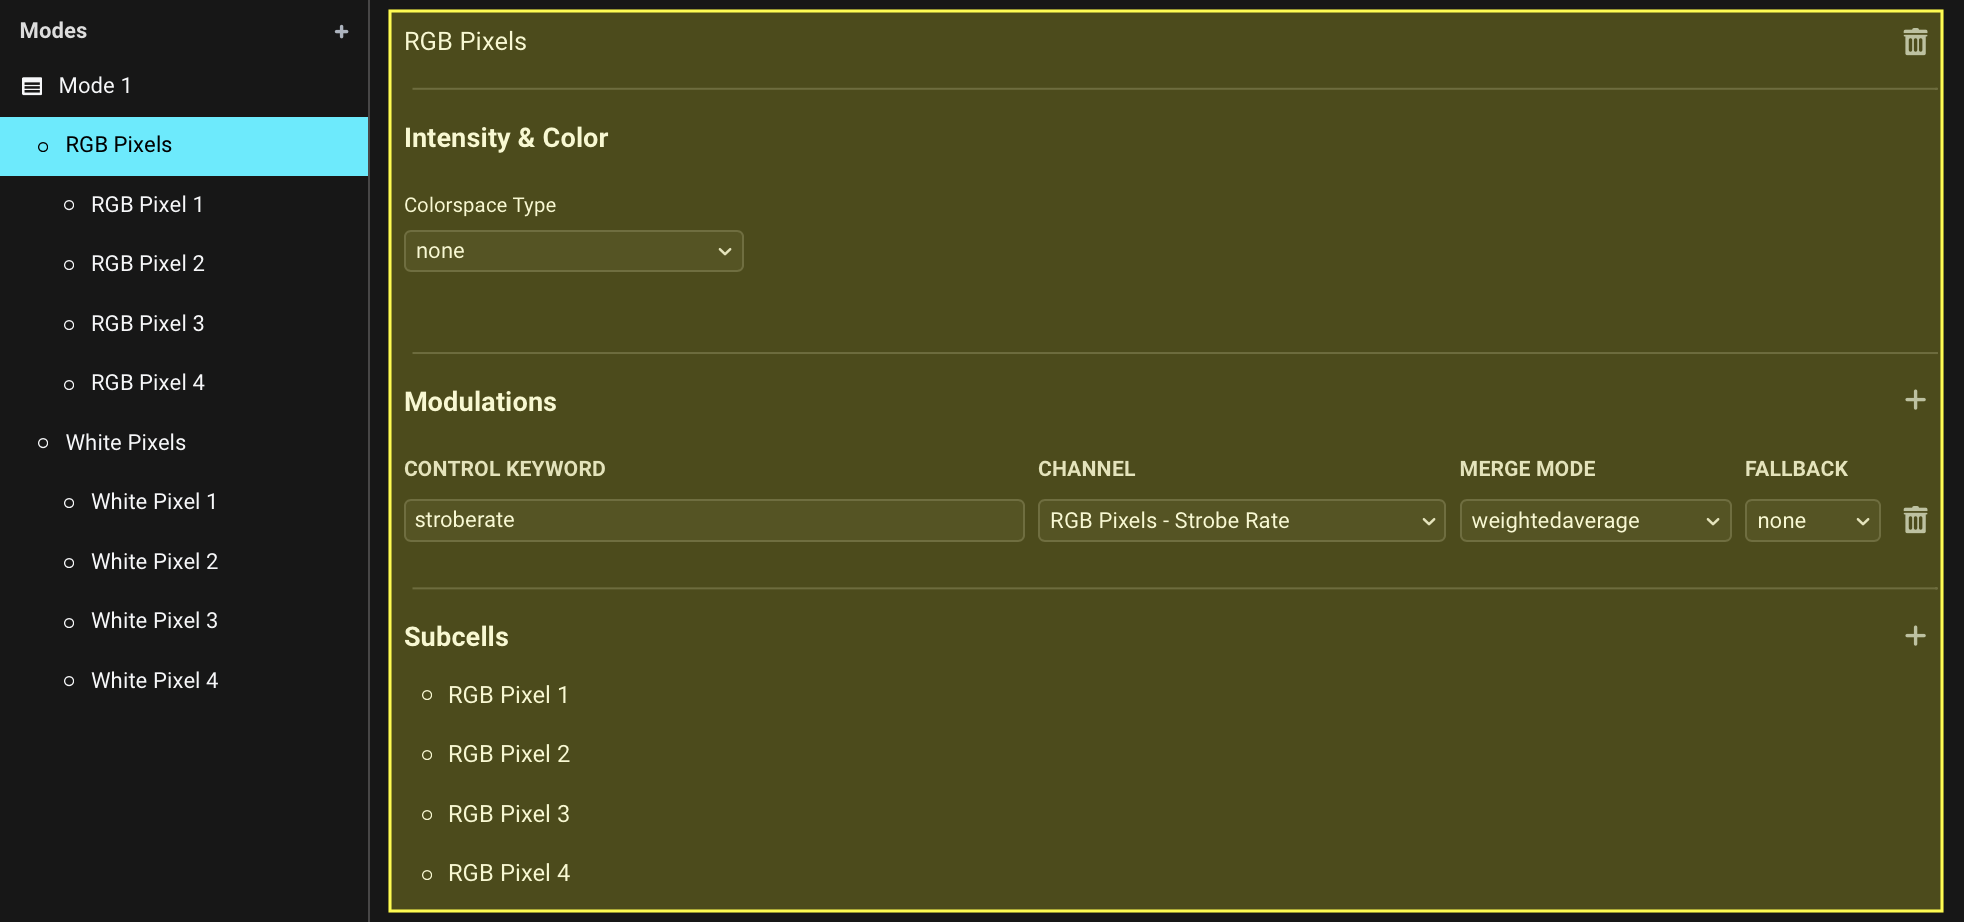
An example of this is a tiltable strobe fixture with physically separated RGB and White pixel sections, with channels that relate to the entire fixture, to all the pixels of each one section at once, and each pixel individually.
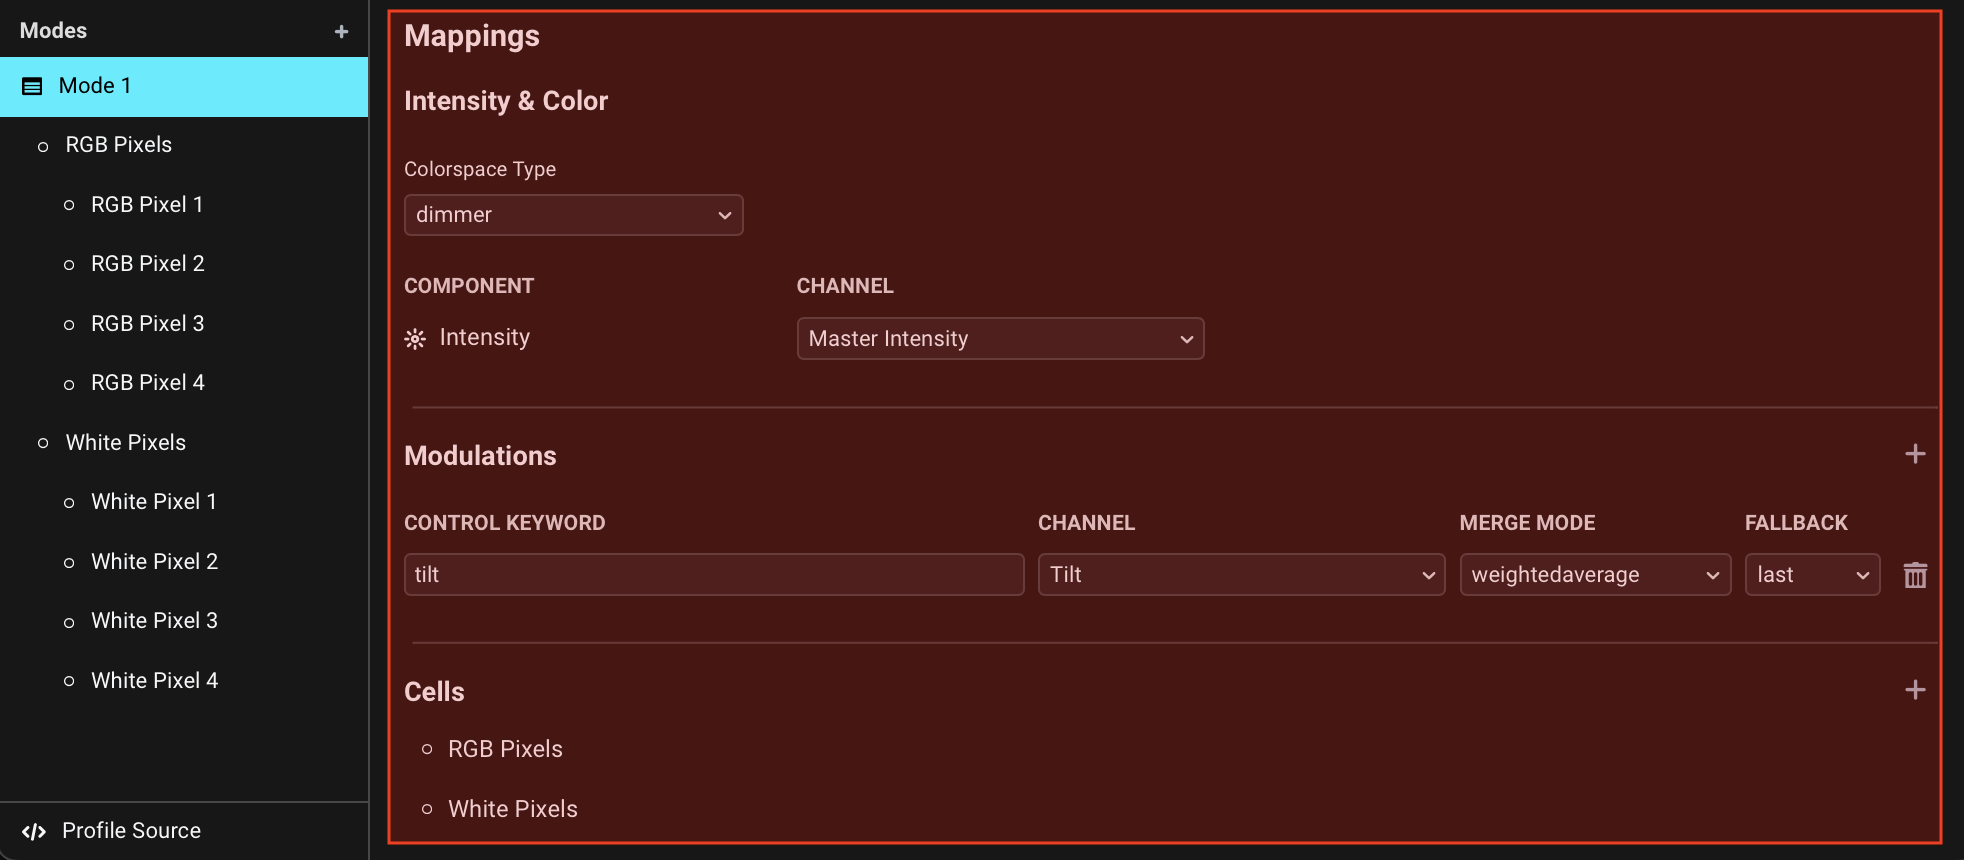
- We begin by adding any (premapped) channels that apply to the entire fixture, e.g. Tilt and Master Intensity.
- We add a Cell for each section - RGB Pixels and White Pixels.
- Using Add to "RGB Pixels" setting, add Shutter and Strobing > Strobe Rate. This adds the RGB Pixels - Strobe Rate channel and adds
stroberateModulation to the RGB Pixels Cell. - Using Add to "White Pixels" setting, add Shutter and Strobing > Strobe Rate. This adds the White Pixels - Strobe Rate channel and adds
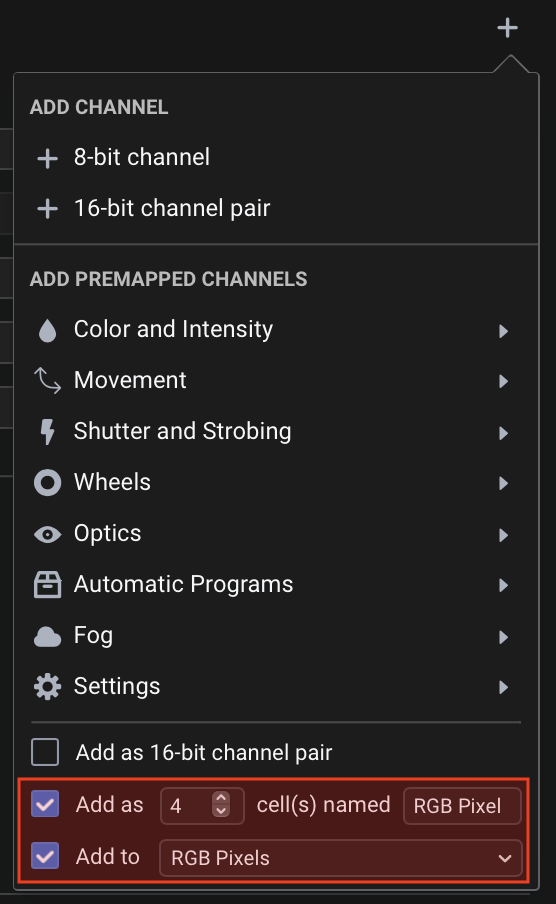
stroberateModulation to the White Pixels Cell. - Using Add to "RGB Pixels" and Add as 4 cell(s) named "RGB Pixel" settings, choose Color and Intensity > RGB. This adds the corresponding RGB channels and appropriately mapped RGB Pixel 1-4 sub-Cells to the RGB Pixels Cell.
- Using Add to "White Pixels" and Add as 4 cell(s) named "White Pixel" settings, choose Color and Intensity > Dimmer/Intensity. This adds the corresponding intensity channels and appropriately mapped White Pixel 1-4 sub-Cells to the White Pixels Cell.
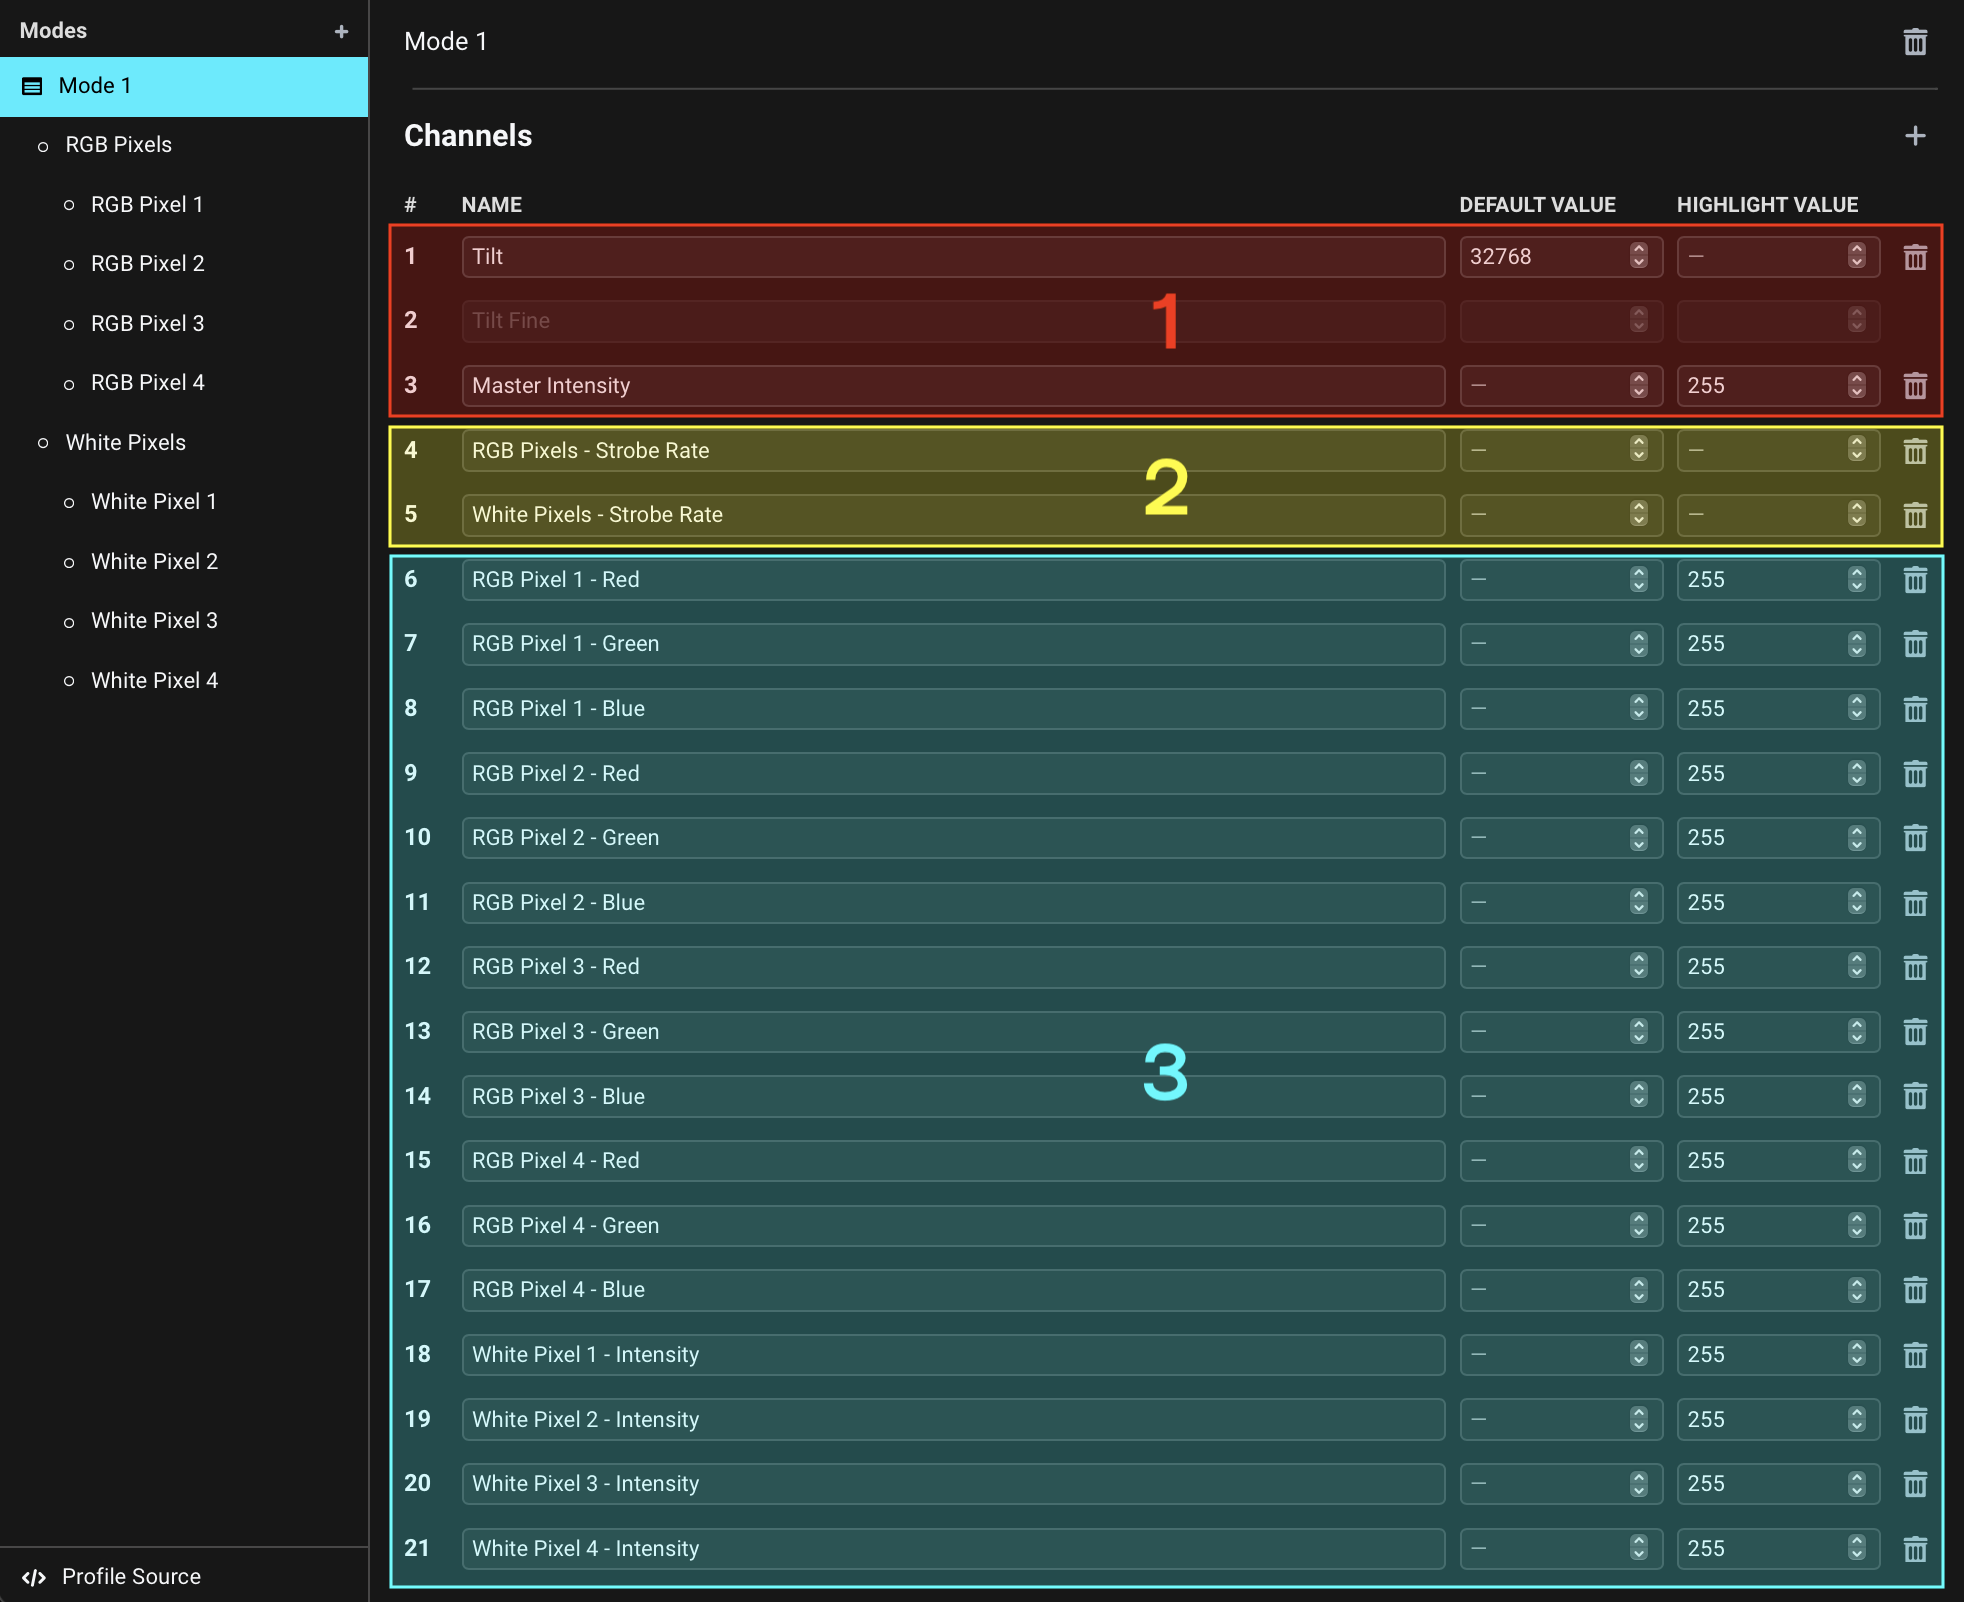
The resulting channel layout has channels for the entire fixture (1), channels for each Cell section (2), and channels for each individual Subcell within a Cell section (3):
Conclusion
We recommend using Add Premapped Channels as the primary way to add Channels and the corresponding Mappings to your fixture profiles, and resort to adding Channels and Mappings from scratch when encountering a channel type for which there is no dedicated preset.
If you have gone through this and the previous article, you are now equipped with all the knowledge necessary to create a fixture profile for just about any fixture out there. Proceed to the next article to learn how to store and use the created fixture profiles in Beam.